
Introduction
# Document owner:     Kashing Limited
# Version:            2.2
# Date:               25/06/2018
# Support:            [email protected]
// Document owner:     Kashing Limited
// Version:            2.3
// Date:               25/06/2018
// Support:            [email protected]
// Document owner:     Kashing Limited
// Version:            0.1
// Date:               25/06/2018
// Support:            [email protected]
' Document owner:     Kashing Limited
' Version:            0.1
' Date:               25/06/2018
' Support:            [email protected]
# Document owner:     Kashing Limited
# Version:            0.1
# Date:               25/06/2018
# Support:            [email protected]
// Document owner:     Kashing Limited
// Version:            0.3
// Date:               28/06/2018
// Support:            [email protected]
Welcome to the Kashing API. You can use our API to access Kashing API endpoints, which can get information on our various products and the integration operations required to integration our solution into your business.
This document is designed to show how to integrate your application with the Kashing Payment Gateway. It contains everything from how to send requests correctly to our API and how to handle responses from our API. There are a number of per-requisites that will be required to integrate with our API these are listed below.
We have language bindings in JSON, Shell, C/C++, GoLang, .Net and Ruby! You can view code examples in the dark area to the right, and you can switch the programming language of the examples with the tabs in the top right.
This API documentation page was created for Kashing. Feel free to edit it and use it as a base for your own API's documentation.
Payments API
The concept behind the Kashing API is that every transaction request that is made to Kashing is done in 2 steps. This is called SPR, (Simple Payment Request). SPR enables the merchant application to initialise a transaction, exchange this information for a "token" or transaction id and complete the transaction when and where they wish.
Some example cases:
Hosted payment - Sending an initialise request to Kashing, this lets us know the amount you wish to charge and a little bit about who the customer is. We will return a token to you that will allow for you to reference in the future to complete a charge on this customer.
Mobile Apps - Making sure payments are secured in your mobile app can be difficult, we allow the merchant to initialise the transaction amount with their backend system and complete the payment on the mobile application, meaning you would have full control over how the payment screen is displayed, while making sure the payment is secure. Alternatively you can use one of those pre-built libraries to let Kashing take control of the payment process.
Custom Payments - With having access to the full Kashing API you are able to customise the payment process. Put Kashing on embedded devices, POS, invoices, tablets, phones, websites plus more!
Authentication
# This is a simple curl command
// This is some C/C++ code
# This is some GO code
# This is some VB code
# This is some Ruby code
In order to use our API you must first request an account. This can be done by contacting Kashing by email on [email protected] or going to our website to request an account.
| Environment | URL | Link |
|---|---|---|
| Development | https://staging.kashing.co.uk | Sign In |
| Production | https://frontend.kashing.co.uk | Sign In |
Once your account has been activated you can proceed to log into your online account. You will find the following information displayed on the API tab under the Organisation link:
| Information | Required | Description |
|---|---|---|
| API Address | Yes | API server URL to send requests to |
| Organisation ID | Yes | Unique identifier and also your Merchant ID |
| Key | Yes | Keep this secure as it is used to sign your requests |
Make note of these parameters as it will be required to proceed with the next step of the API integration.
Authenticate your account by including your credentials in API requests. You can manage your API keys in the Dashboard.
Requirements
Kashing as a payment solution is agnostic from the type of technology you wish to use. We have developed our platform to support all current and future systems. As long as it meets the below minimum conditions you will be able to enable the technology to facilitate payments.
- HTTPS: Format and submit GET & POST requests.
- SSL: Connections must be secure at all times when connecting to the Kashing API.
- SHA1: The ability to hash requests that are sent to our API. (See Protocol signing).
- JSON: Support parsing & Constructing JSON data.
Protocol Signature
Request
{
    "merchantid": "1",
    "refundamount": "5",
    "orderdescription": "Test transaction",
    "transactionid": "1320145192f1e87157dc248541cd",
    "psign": "154f150b460bdf95a2784aab001ccdc0537aa7c1"
}
Successful response
{
    "responsecode": 1,
    "reasoncode": 1
}
Error response
{
    "responseCode": 3,
    "reasonCode": 104
}
Every request that is sent to the gateway requires some form of authentication, the most common of the authentication methods is the use of protocol signing, this will be referred to as the "psign" from now on. This is a method whereby we use a one way hash of your secret key + the data which you have sent. This creates a very strong value for determining if you are the person who is supposed to be sending the request.
To create the psign for the packet, you will need to create a string of all the parameters in the order of which they are sent, salt this string with the secret key found for the merchant and then do a SHA1 hash of this string.
It is important to preserve your order of the parameters sent.
For the above bodies, we will use a key test Append the key in front so the constructed string before hashing will look like this:
String: test15Test \"transaction\"1320145192f1e87157dc248541cd
Now perform a SHA1 hash calculation on the string to produce the psign:
psign: 3990e9d49dfad1410da1ca6925d7e9433bbcb55a
You can use the following link to try it for yourself
API Response Codes
Nearly every request that is made to the gateway API will have a Response which will contain a Response and Reason code. Listed below are the possible Response and Reason codes, all other codes not represented in this document are to be treated as errors.
Response Codes
| Code | Detail |
|---|---|
| 1 | Transaction is approved |
| 2 | Transaction is declined |
| 3 | Error |
| 4 | Approved Redirect |
| 5 | Customer canceled transaction |
| 6 | Customer pending approval from bank |
| 10 | Card Storage Only |
| 501 | Authentication Failure Throttling |
Reason Codes
| Code | Detail |
|---|---|
| 1 | Approved and Success |
| 2 | Declined |
| 3 | Refunded |
| 4 | Redirect |
| 5 | Cancelled |
| 6 | Pending Approval |
| 7 | Database Error |
| 8 | Invalid Transaction |
| 9 | Unknown Merchant |
| 10 | Card Storage |
| 100 | Connection Not Secure |
| 101 | Invalid HTTP Method |
| 102 | Field Missing |
| 103 | Field Invalid |
| 104 | Authentication Failed |
| 105 | General Error |
| 107 | Anti Fraud |
| 108 | Bank Redirect |
| 109 | Transaction Not Found |
| 110 | Transaction Is Invalid |
| 111 | MID Is Invalid |
| 112 | Request Duplication |
| 113 | Service error |
| 140 | Refund Not Supported |
| 160 | Recurrent Not Supported |
| 170 | Invalid MID |
| 171 | Invalid MID Card Not Supported |
| 172 | Invalid MID Currency Not Supported |
| 173 | Encryption Error |
| 175 | Transaction Completed |
| 176 | Recurrent velocity |
Magic Cards
All card information is directly submitted to Kashing servers. Any information submitted will be stored so please be careful not to submit sensitive information during your testing process. Please use the below listed magic card numbers instead of actual data.
| Description | Value |
|---|---|
| MasterCard Card Number | 5223450000000007 |
| Expiry Date | 12/2025 |
| CVV2/CVC2 Code | 090 |
| Description | Value |
|---|---|
| MasterCard Card Number | 5223450000000015 |
| Expiry Date | 12/2025 |
| CVV2/CVC2 Code | 353 |
| Description | Value |
|---|---|
| MasterCard Card Number | 5186150000002228 |
| Expiry Date | 12/2025 |
| CVV2/CVC2 Code | 222 |
| Description | Value |
|---|---|
| MasterCard Card Number | 2223000010175716 |
| Expiry Date | 12/2019 |
| CVV2/CVC2 Code | 384 |
| Description | Value |
|---|---|
| MasterCard Card Number | 2223000010175724 |
| Expiry Date | 12/2019 |
| CVV2/CVC2 Code | 592 |
| Description | Value |
|---|---|
| Visa Card Number | 4176661000001015 |
| Expiry Date | 12/2018 |
| CVV2/CVC2 Code | 281 |
| Description | Value |
|---|---|
| Visa Card Number | 4176661000001023 |
| Expiry Date | 12/2018 |
| CVV2/CVC2 Code | 720 |
| Description | Value |
|---|---|
| Visa Card Number | 4176661000001031 |
| Expiry Date | 12/2018 |
| CVV2/CVC2 Code | 681 |
Init Transaction
Example request
{
  "transactions": [
    {
      "merchantid": 167,
      "amount": "1000",
      "currency": "GBP",
      "returnurl": "https://merchant.com/browsersuccess",
      "webhook": "https://server-to-server.merchant.com/notify",
      "merchanturl": "https://merchant.com/continue-shopping",
      "description": "1 x Test order from",
      "language": "en",
      "email": "[email protected]",
      "phone": "07770000000",
      "firstname": "Barry",
      "lastname": "O’Conner",
      "address1": "Flat 6 Primrose Rise",
      "address2": "347 Lavender Road",
      "city": "Northampton",
      "postcode": "NN17 8YG",
      "country": "UK",
      "datetocomplete": "2022-01-01",
      "uid": "O-99999",
      "pid": "232",
      "processtype": 1,
      "method": "1",
      "psign": "3A4690BB138DA0E479BAFAAAE0F57CDAB4EFCD64"
    }
  ]
}
// TBD
# TBD
Public Function Init_Transaction(amount As String) As String
    Dim transactions As List(Of Transaction) = BuildTransaction(amount)
    Dim json As String = ToJson(transactions)
    Dim jsonConcate As String = StringUtil.getValuesFromJson(json)
    Dim psign As String = StringUtil.PSign(OrgSecret, jsonConcate)

    transactions.Item(0).psign = psign
    json = ToJson(transactions)
    json = "{""transactions"":" + json + "}"
    Dim uri As Uri = New Uri(InitTransaction)

    Dim output = ServiceCall(uri, json)
    Return output
End Function
path = 'json/transaction/init'
params = {
  # Add parameters here
}

# Create URI
uri = URI(File.join('https://api.kashing.co.uk', path))

http = Net::HTTP.new(uri.host, 8443)
http.use_ssl = true

request = Net::HTTP::Post.new(uri)
request['Content-Type'] = 'application/json'
request['Accept'] = 'application/json'
request.body = JSON.generate(params)

response = http.request(request)
if response.code == '200'
  JSON[response.body]
end
// TBD
Success Response
{
  "results": [
    {
      "responsecode": 4,
      "reasoncode": 1,
      "merchantid": 167,
      "uid": "O-99999",
      "token": "4G5RaqSexON",
      "amount": 1000,
      "currency": "GBP",
      "redirect": "https://staging-backend.kashing.co.uk/transaction/serve?ID=4G5RaqSexON"
    }
  ]
}
Error Response
{
  "results": [
    {
      "responsecode": 3,
      "reasoncode": 104,
      "merchantid": 167,
      "uid": "O-99999",
      "token": "lbWrCh45qQf",
      "amount": 1000,
      "currency": "GBP",
      "redirect": "https://staging-backend.kashing.co.uk/transaction/serve?ID=lbWrCh45qQf",
      "error": "Psign failed"
    }
  ]
}
The first step is Initialise the transaction. This method is used to fill non sensitive information about the transaction and customer into the Kashing system, which will then create a transaction token for you. In order to be able to submit the sensitive card information you will need to reference the token. While testing ensure that you don't submit active PAN numbers, please contact Kashing for test PAN numbers.
Type: POST
Path: /transaction/init
| Parameter | Type | Description |
|---|---|---|
| merchantid | Integer | Kashing Merchant ID |
| amount | String | The amount must be in cents i.e: Use 100 for £1.00 |
| currency | String (Optional) | The currency of the transaction ISO 4217: GBP, EUR, USD, ZAR |
| returnurl | String | The URL for the browser's return https://webshop.kashing.co.uk/thanks |
| merchanturl | String | Merchant default fallback URL https://webshop.kashing.co.uk/cart/id=xxxx |
| webhook | String (Optional) | Webhook URL for server-to-server result notification https://example.com/webhook?id=23424 |
| description | String | Order description for cardholder statement |
| language | String (Optional) | Language for the hosted page ISO 639-1: GBP (default), EUR, USD, ZAR |
| String (Optional) | Cardholder email | |
| phone | String (Optional) | Cardholder phone |
| firstname | String | First name on the card (Optional for hosted pages) |
| lastname | String | Last name on the card (Optional for hosted pages) |
| address1 | String | Cardholder registered address line 1 (Optional for hosted pages) |
| address2 | String (Optional) | Cardholder registered address line 2 |
| city | String | Cardholder registered city |
| postcode | String | Cardholder registered postcode |
| country | String | Cardholder registered country code ISO 3166-1 |
| datetocomplete | String (Optional) | Scheduling payments YYYY-MM-DD |
| uid | String (Optional) | Unique order ID |
| pid | Integer (Optional) | Partner ID for commission |
| processtype | Integer (Optional) | Type of transaction 1 = e-commerce, 2 = moto, 3 = e-wallet, 4 = chip & pin |
| psign | String | Calculated SHA-1 HASH 3A4690BB138DA0E479BAFAAAE0F57CDAB4EFCD64 |
Common Responses Breakdown
| Field | Type |
|---|---|
| responsecode | What kind of response is this |
| reasoncode | The reason for this response |
| token | The Temp ID created for this transaction |
| amount | How much is to be charged |
| redirect | Where to redirect your customer. For hosted payment |
| results | Array for results |
Hosted Payment - Return
If you have decided to use Kashings' hosted payment page then once the user has filled in their information and it has been processed, they will be returned to a landing page specified in the returnurl.
Below are a few possible scenarios that the transaction can end in:
- Successful transaction The customer is served a thank you before being redirected back to the merchant landing page. E.g.
https://www.merchant.com/return?uid=Trans1+Trans2&transactionid=68g6fg86dsfg78478gfw+78bw8s7rbg78rwbs&ResponseCode=1+1&reasoncode=1+1 - Failure The customer's transaction fails, they are served an error message and this error code is sent back to the merchant. E.g.
https://www.merchant.com/return?uid=Trans1+Trans2&transactionid=68g6fg86dsfg78478gfw+78bw8s7rbg78rwbs&responsecode=3+1&reasoncode=5+1 - Cancel The customer chose to cancel the transaction
After the card holder has been redirected to the above link, you are provided the UID, TransactionID, ResponseCode and ReasonCode. Using the parameters given you can display the appropriate error page and set the transaction ID & Error codes appropriately in your own Data-Base. Please use the "retrieve" transaction API to confirm the status of the transaction.
Parse the values in the order they are given, Using the above transaction return URL there are 2 transaction responses they should be parsed to give the following data:
transactionid: 68g6fg86dsfg78478gfw , responsecode: 1 , reasoncode: 1
Find Transaction
Request
curl --request POST \
  --url https://staging-backend.kashing.co.uk/transaction/find \
  --header 'content-type: application/json' \
  --data '{"token":"rJdjuxO1V1i", "psign": "1D0FDF9AE878F49019F902B9A4870BC3002D760A"}'
// TBD
# TBD
Public Function Get_Transaction(token As String) As String
    Dim transaction As TransactionGet = BuildGetTransaction(token)
    Dim json As String = ToJson(transaction)
    Dim jsonConcate As String = StringUtil.getValuesFromJson(json)
    Dim psign As String = StringUtil.PSign(OrgSecret, jsonConcate)

    transaction.psign = psign
    json = ToJson(transaction)
    Dim uri As Uri = New Uri(GetTransaction)

    Dim output = ServiceCall(uri, json)
    Return output
End Function
# TBD
// TBD
Success response
{
    "merchantid": 3,
    "amount": 1200,
    "status": 1,
    "redirect": "https://staging-backend.kashing.co.uk/transaction/serve?ID=rJdjuxO1V1i",
    "amounttocomplete": 0,
    "datetime": "2018-06-30 20:36:27 +0000",
    "datetocomplete": "",
    "transactionid": "rJdjuxO1V1i",
    "currency": "EUR",
    "firstname": "Barry",
    "lastname": "Green",
    "address1": "56",
    "address2": "The Street",
    "city": "London",
    "country": "GB",
    "postcode": "SW19RD",
    "email": "[email protected]",
    "phone": "+447563829279",
    "description": "EUR Purchase at Sunset B&B",
    "processtype": 4,
    "responsecode": 1,
    "reasoncode": 1,
    "card": "476173******0010",
    "cardissuer": "VISA CREDIT",
    "cardtype": "",
    "cardbin": "",
    "cardexpiry": "1230",
    "gatewaymessage": "Transaction has been executed successfully.",
    "merchantname": "Sunset B&B"
}
Error response
{ "responsecode": 3, "reasoncode": 102 }
In this method, using the final transactionid you received when submitting a transaction, you can retrieve the transaction information.
Type: POST
Path: /transaction/find
| Parameter | Type | Description |
|---|---|---|
| token | The identifier for the transaction to search | |
| psign | String | SHA-1 Hash |
Get Transaction Breakdown
| Field | Type |
|---|---|
| responsecode | What kind of response is this |
| reasoncode | The reason for this response |
Charge Transaction
Request
curl --request POST \
  --url https://staging-backend.kashing.co.uk/transaction/charge \
  --header 'content-type: application/json' \
  -- data '{
    "token": "h3Z7wzy7Rih",
    "cardholdername": "John Smith",
    "cardnumber": "5413 3300 9000 0218",
    "cvv": "123",
    "expiry": "12/22"
  }'
// TBD
# TBD
' TBD
# TBD
// TBD
Success response
{ "responseCode": 1, "reasonCode": 1}
Error response
{ "responseCode": 3, "reasonCode": 102 }
If you choose not to use the hosted payment solution, you can charge the card using the token. This allows the merchant to generate their own payment page or manually submit card information.
Type: POST
Path: /transaction/charge
| Parameter | Type | Description |
|---|---|---|
| cardnumber | String | Card number to charge |
| cvv | String | Security code of card |
| expiry | String | Returned from original Yes transaction |
| token | String | Token received from initialised |
Recharge Transaction
Request
curl --request POST \
  --url https://staging-backend.kashing.co.uk/transaction/recharge \
  --header 'content-type: application/json' \
  --data '{
    "token": "rJdjuxO1V1i",
    "amount": "1200",
    "description": "Another EUR Purchase at Sunset B&B",
    "psign": "9E6C9953D1FBCD63C3829C745F6999B5F3BB6F68"
  }'
// TBD
# TBD
' TBD
# TBD
// TBD
Success response
{
    "token": "rJdjuxO1V1i",
    "amount": "1200",
    "description": "Another EUR Purchase at Sunset B&B",
    "psign": "9E6C9953D1FBCD63C3829C745F6999B5F3BB6F68"
}
Error response
{ "responsecode": 3, "reasoncode": 10, "error": "card not found" }
If you wish to recharge a transaction you can send a request using a previous transaction processed to recharge. This feature is subject to service permissions. If you have any question or queries please contact our support team.
Type: POST
Path: /transaction/recharge
| Parameter | Type | Description |
|---|---|---|
| merchantid | String | Integer Ex. (123) |
| token | String | Returned from original transaction |
| description | String | Description of transaction |
| amount | String | The amount you wish to charge ex. 99.99 |
| psign | String | SHA-1 Hash |
Refund Transaction
Request
curl --request POST \
  --url https://staging-backend.kashing.co.uk/transaction/refund \
  --header 'content-type: application/json' \
  --data '{
    "token": "rJdjuxO1V1i",
    "amount": "1200",
    "psign": "9E6C9953D1FBCD63C3829C745F6999B5F3BB6F68"
}'
// TBD
# TBD
' TBD
# TBD
// TBD
Success response
{
    "token": "rJdjuxO1V1i",
    "amount": "1200",
    "psign": "9E6C9953D1FBCD63C3829C745F6999B5F3BB6F68"
}
Error response
{ "responsecode": 3, "reasoncode": 102 }
If you wish to refund a transaction you can send a request using the previous transaction ID to refund specifying the amount to refund. Using the ID taken from a successful transaction, you can request a refund for this transaction using the below API call.
Type: POST
Path: /transaction/refund
| Parameter | Type | Description |
|---|---|---|
| merchantid | String | Integer Ex. (123) |
| transactionid | String | Returned from original transaction |
| refundAmount | String | The amount to be refunded ex. 1.97 |
| psign | String | SHA-1 Hash |
Webhook URL
Request
POST https://server-to-server.merchant.com/notify HTTP/1.1
> Content-Type: application/json
> Accept: */*
> Content-Length: 854
| {
|     "merchantid": 3,
|     "amount": 4500,
|     "status": 6,
|     "redirect": "https://api.kashing.co.uk/transaction/serve?ID=DopDsNlcuki",
|     "amounttocomplete": 0,
|     "datetocomplete": "",
|     "orderid": "ABC0123456789",
|     "transactionid": "DopDsNlcuki",
|     "currency": "GBP",
|     "firstname": "Hein",
|     "lastname": "de Kock",
|     "fullname": "Hein de Kock",
|     "address1": "8 Hobbema Street",
|     "address2": "Petervale",
|     "city": "Sandton",
|     "country": "",
|     "postcode": "2191",
|     "email": "[email protected]",
|     "phone": "+27 82 894 3629",
|     "description": "1 x Test order edited by eneko",
|     "processtype": 1,
|     "responsecode": 3,
|     "reasoncode": 105,
|     "card": "523909******5043",
|     "cardissuer": "MASTERCARD",
|     "cardtype": "",
|     "cardbin": "523909",
|     "cardexpiry": "10/21",
|     "gatewaymessage": "Sub-merchant ID unknown. Transaction cannot be completed.",
|     "merchantname": "Sunset B&B"
| }
Success response
HTTP Response: 200
Payment gateway will expect a 200 code after sending the notification.
Error response
Any HTTP status code rather than 200, will be handled as failure.
If the webhook parameter is given on initialisation, any status change of the transaction will result in a notification being sent to the webhook url.
Type: POST
Example Webhook: https://server-to-server.merchant.com/notify
Kurvey Kiosk Agent
The Kurvey Kiosk Agent is a cross platform standalone application for initialising payments, telemetry information and device management. The agent is used for connecting unattended systems to a physical payment devices such as Kashing Kurvey Double, through RS232/USB/MDB/Pulse or TCP/IP.
The standalone application is an active HTTP server able to receive TCP and JSON requests to initiate a payment process or command request to the attached device. A response is obtained from the device and the transaction is processed upstream via a payment gateway server and a success/fail result is returned and interpreted to the requester.
Getting started with Kurvey
Host application and OS
The host application or OS is both the physical environment and the external application for the processor that will be providing the platform for the Kurvey Kiosk Agent to run on. It could be multiple physical devices or all in one. It is expected that the implementer will specify the environment parameter for the Kurvey Kiosk Agent to run on and provide or dictate the details as is required for them final implementation.
It is expected that the host application or OS will be either Microsoft Windows 10 with WSL support or a version of Linux with x86, x86_64 or ARMv7 processor support.
The host application is the component that will provide networking support to the Kurvey Kiosk Agent.
Connectivity and wiring
The TeleBox supports the following internet connectivity options:
Ethernet
The Telemetry is equipped with an Ethernet connector located on the front panel of the unit. The unit connects to the Internet network (or other internal network) using the standard RJ45 connector. A software library that facilitates the Ethernet connection as well as SSL implementation is included as part of the product SDK.Cellular modem
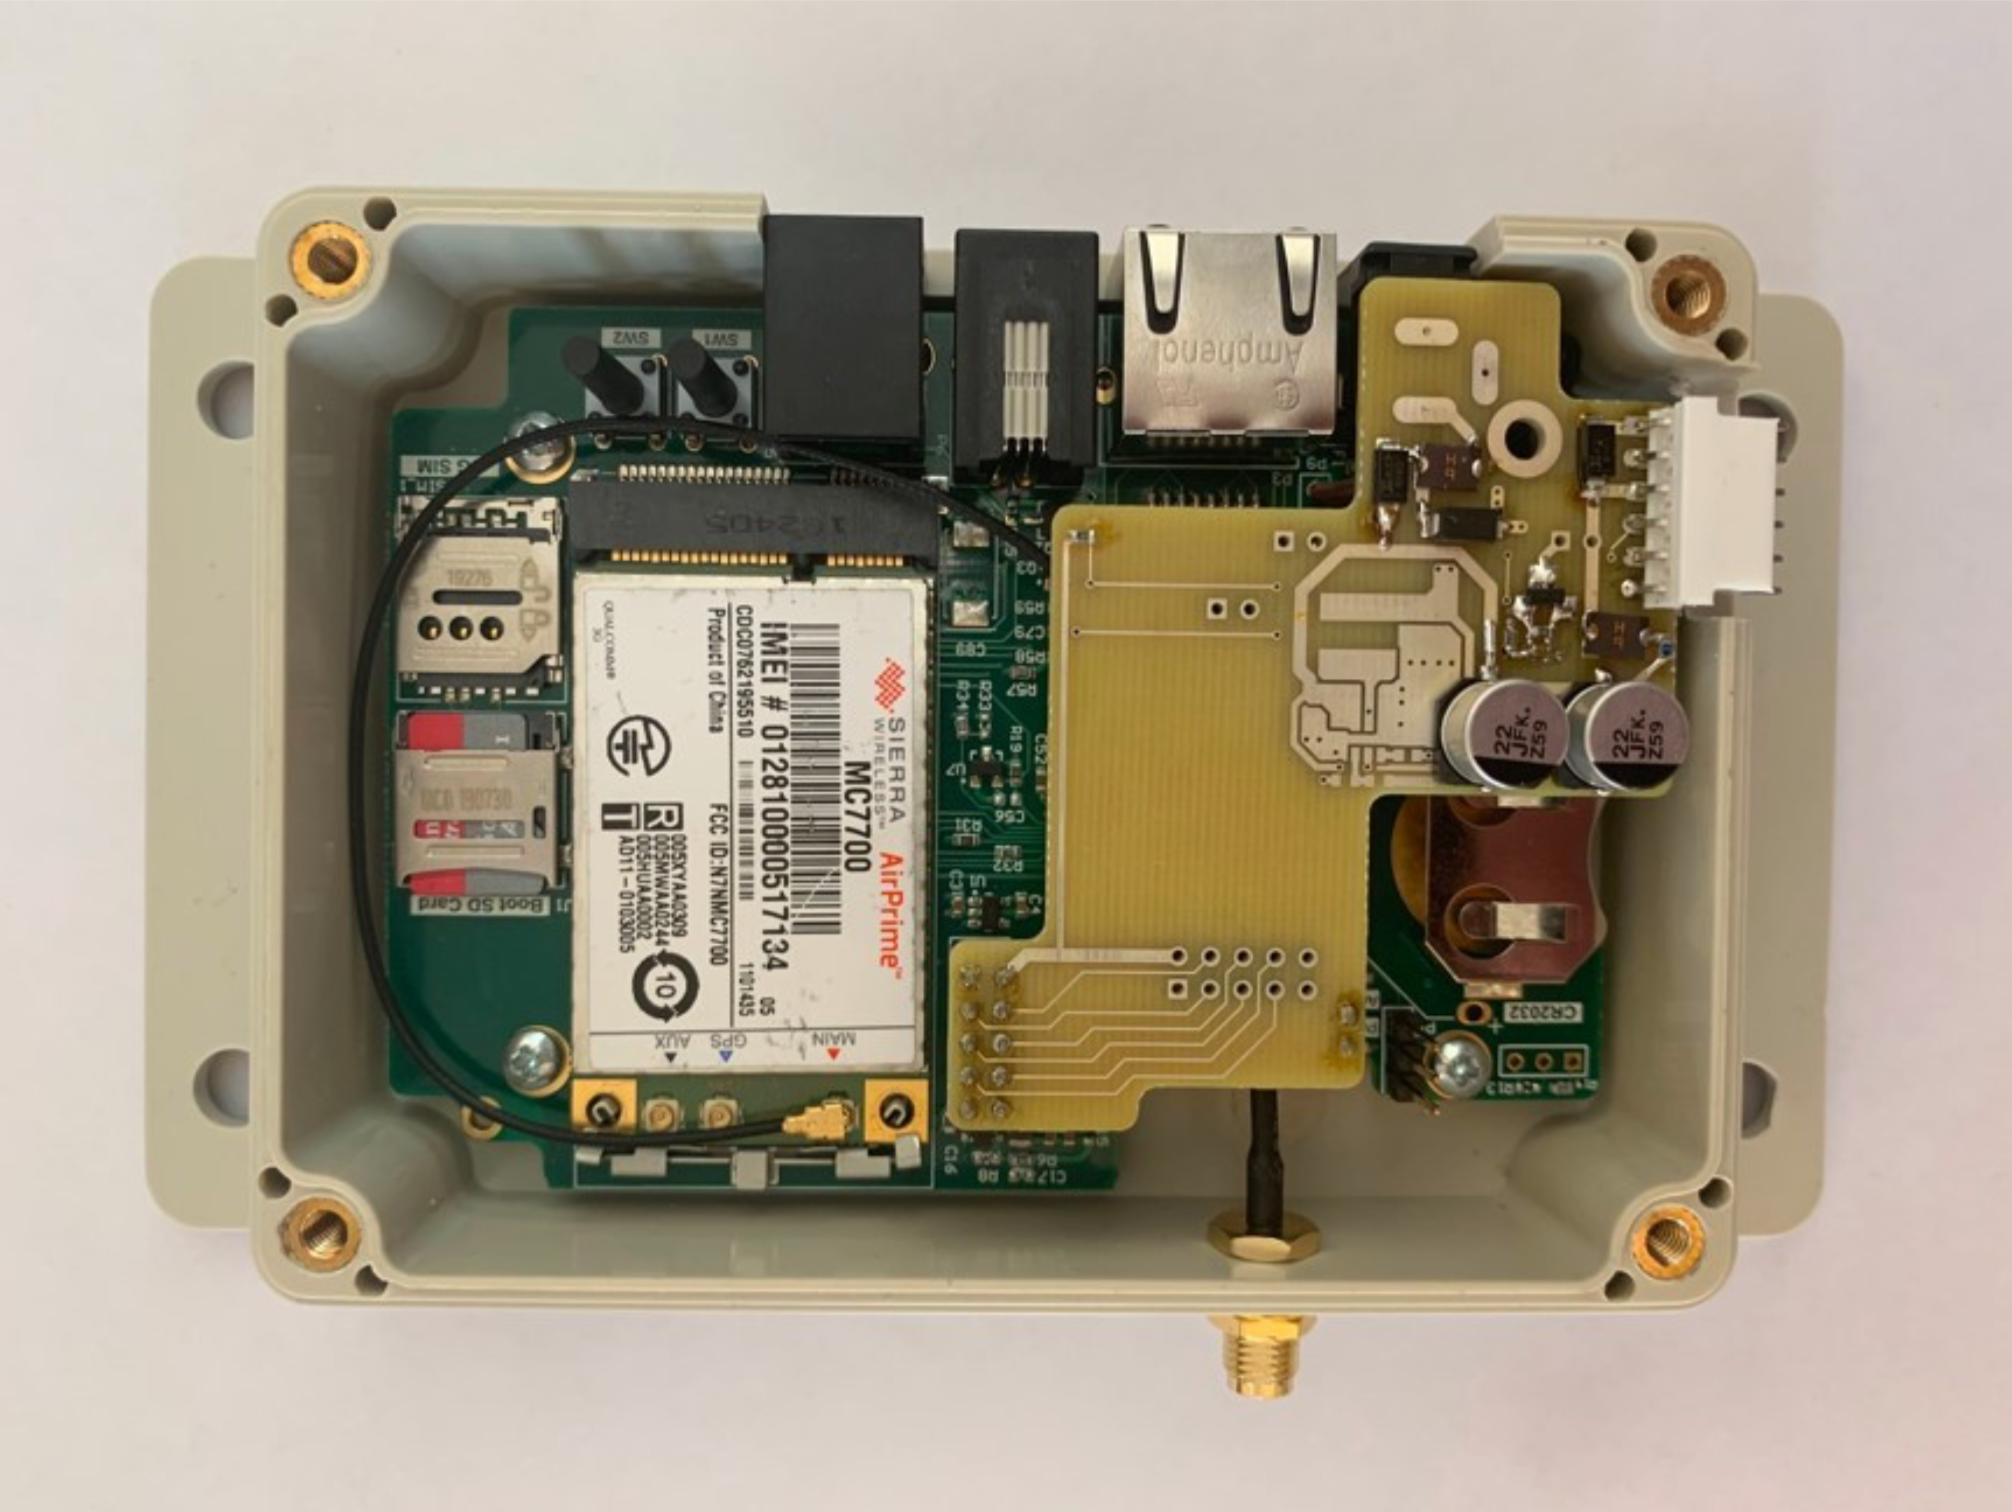
The TeleBox is equipped with a certified cellular modem, optional antenna is available as part of the product accessories collection.
The product is delivered with software API that allows for an establishment of connection, through SMS, mobile data and more.
Secured SSL communication is supported as part of the modem API.
Under the hood
The TeleBox hardware design is modular and is comprised of Telemeter main board and optional cellular modem, WIFI adapter and battery pack.Final software implementation of the host application will depend on the product specific hardware configuration.
Agent mode
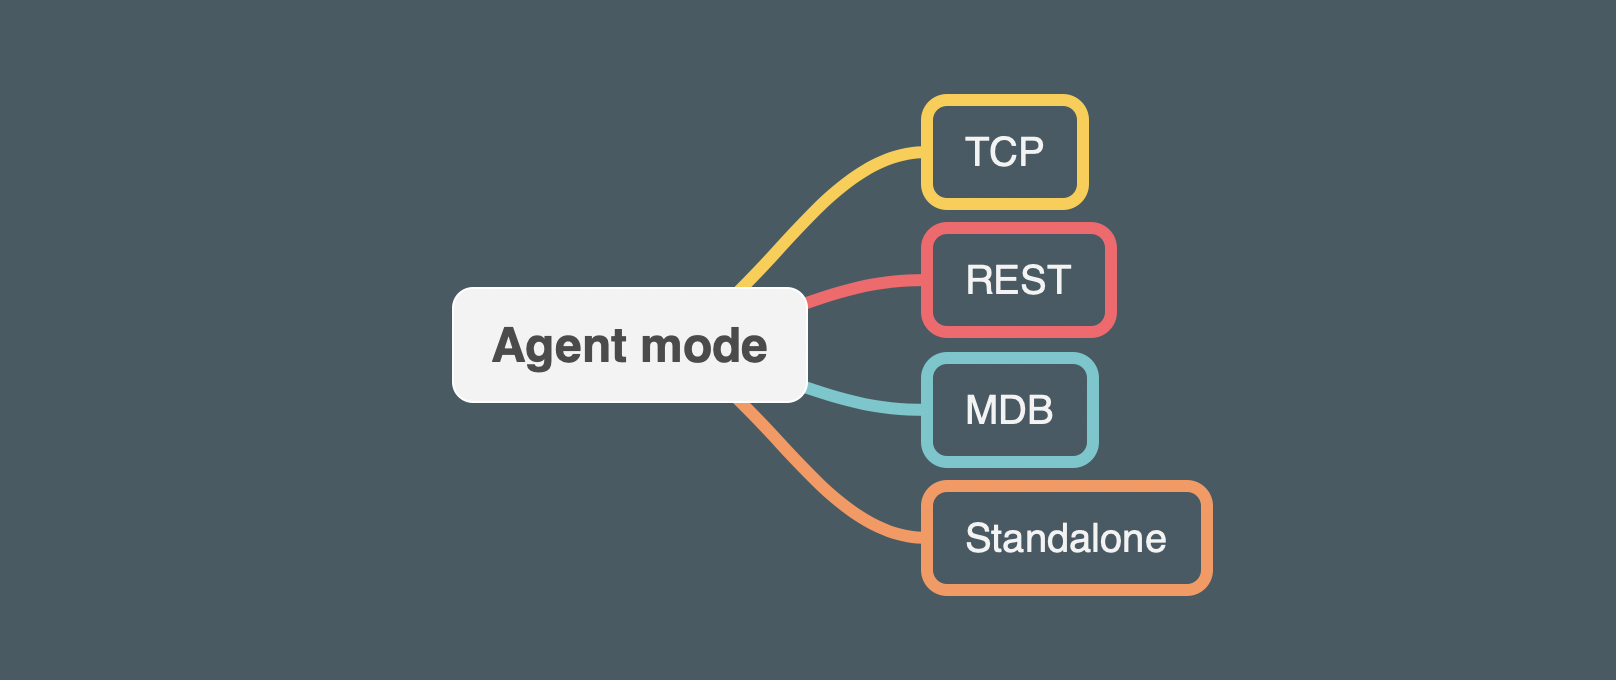
The Kurvey Kiosk Agent provides multiple modes for running the service. These modes are configured through the Kashing Admin Portal.
The Kurvey Kiosk Agent will receive configuration parameters from the Terminal Management (TMS) to change the running behaviour. No local configuration is required. The modes allow the System several options for integration:
STANDALONE MODE
This mode doesn't require any integration and is an autonomous service.
Standalone mode is normally associated with pulse configurations where a set price or price range with a number of pulses are interpreted.
It emulates a coin mechanism and is used as a "Tap First" model. The device is always armed and ready to charge the pre-configured amount. When the payment process completes another one will start automatically be initiated.
TCP SOCKET
Default port: 11091
The Kurvey Agent supports standard BSD sockets over TCP/IP. By default the service is configured to listen on the loopback IP 127.0.0.1 address TCP port 11091.
REST API (JSON)
The JSON API runs as a HTTP web server on the host system. Kurvey Kiosk Agent is configured to listen by default on any ip address IP 0.0.0.0 port 8080. This can be changed through the Kashing Admin Portal. The Kurvey Kiosk Agent also has configuration settings for the attached serial devices and associated port. Changes to the configuration and settings can be applied though the online Terminal Management System.
Standard unencrypted HTTP post requests is supported by default with no TLS or encryption required. This is due to the fact that no traffic or requests to the local Kurvey kiosk Agent from the host application contain any sensitive information. The Kurvey Kiosk Agent in turn will ONLY support HTTPS TLS outbound connections over the public internet.
MDB (MULTI DROP BUS)
TBA
Setup
Ubuntu 18.04 installation
UBUNTU INSTALLATION
curl -sSL https://www.kashing.co.uk/downloads/kurvey/install.sh | sudo bash -s -- staging
curl -sSL https://www.kashing.co.uk/downloads/kurvey/install.sh | sudo bash -s -- production
The Kashing Kurvey Agent is an automated install process through online scripts.
Windows 10 installation
![]()
WINDOWS INSTALLATION
# Run with administrator privileges in a powershell terminal.
powershell -nop -c "iex(New-Object Net.WebClient).DownloadString('https://www.kashing.co.uk/downloads/kurvey/install.ps1')"

# NOTE: The installation process may reboot your PC after installing WSL.
#       It is required to execute the command one more time to complete
#       the installation process.
RUN THE AGENT
# Available environments:
#
# - staging (for testing)
# - production (live)

C:\Windows\System32\bash.exe -c 'sudo /opt/kagent/kurvey-agent --env staging'
C:\Windows\System32\bash.exe -c 'sudo /opt/kagent/kurvey-agent --env production'
Kurvey Kiosk Agent is a standalone application which runs on Microsoft WSL (Windows Subsytem for Linux). We provide a one-line installation script to ensure all components are setup properly, but you can also perform this steps manually following the installation script.
Among other things, the installation script will assist you with the following steps:
- Enable WSL under Windows features
- Download Ubuntu 18.04 WSL image (this can take a while based on your connection)
- Setup a new user
- Download kurvey agent
- Configure a background service
- Create inbound firewall rules for port
8080 (REST)and11091 (TCP)
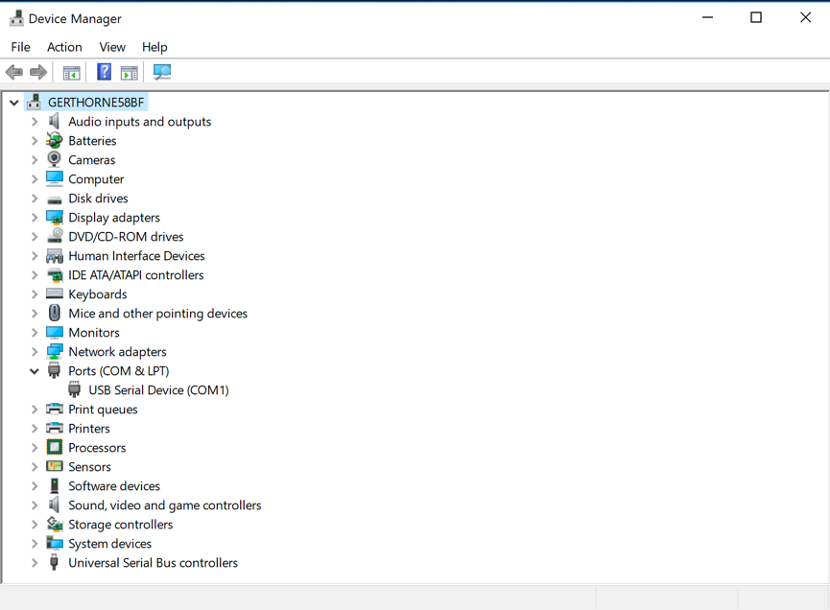
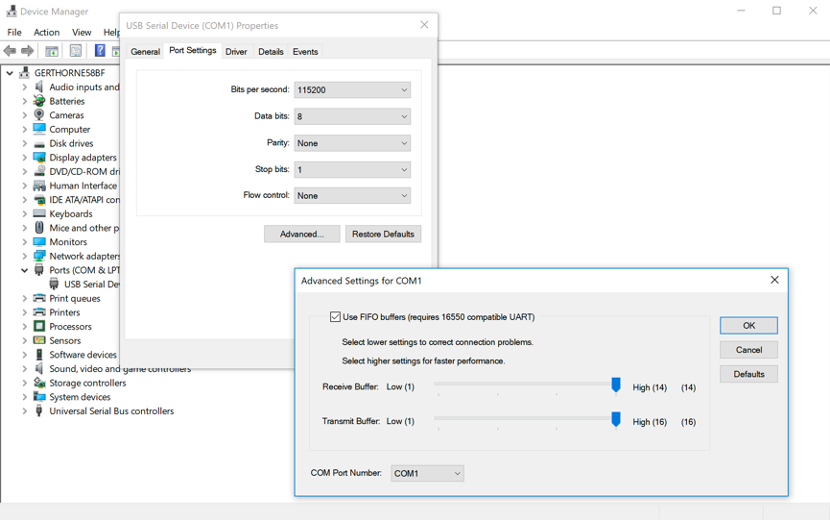
USB CONFIGURATION
The reader must be statically configured to use COM1 on the Windows platform. Please find below reference as a guide to enable the configuration.
Transaction Workflow
The Kurvey Kiosk Agent provides the system developers a pre-certified integration and remote management solution. It allows for easily and quickly develop into third party Kiosk software without dealing with the complexity of the EMV transactions processing or certification.
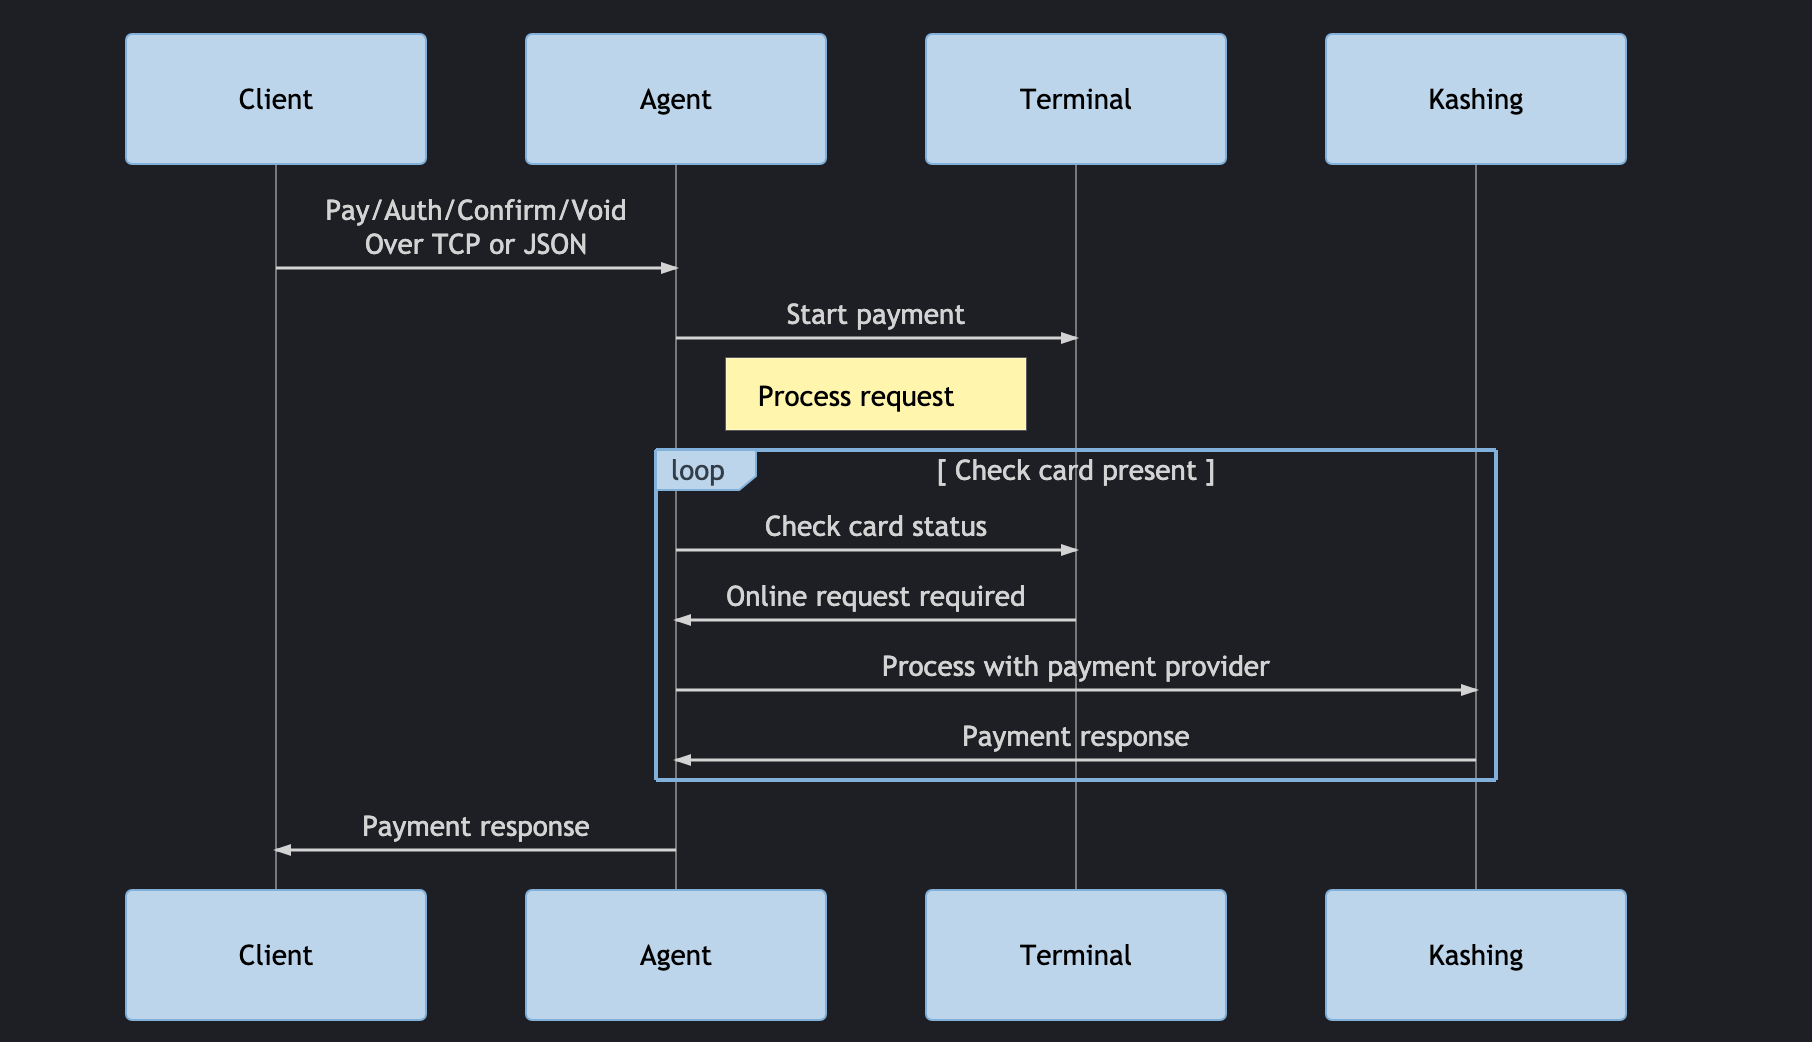
Straight Sale - Single step payment
PAY TRANSACTION
This is the recommended approach. A single step card transaction (as opposed to 2 step transaction done with the PreAuthorize and ConfirmTransaction commands). Kurvey Kiosk will wait for a card to be presented to the Reader, Read the card, and process it with the payment service. It will then send a TransactionComplete event. The application can cancel the last transaction by calling the VoidTransaction method before another transaction has been performed.
Authorize and confirm - Two step payment
AUTHORIZE
Pre-authorize a card with the payment processor. Ideal for time or volume-based solutions where the full and final amount is not known before the payment is initiated.
Kurvey Kiosk will wait for a card to be presented to the Reader, Read the card, and process it with the payment service if needed. It will then send a TransactionComplete event. If the transaction was approved (TransactionComplete event returned with status “OK”), the application must call ConfirmTransaction or VoidTransaction method in order to complete the transaction.
CONFIRM
A confirmation request is the second stage to an authorization request. It is used to confirm the authorization obtained so that settlement can take place.
Cancel transaction
VOID
A Void Transaction request is used to void a transaction in 2 cases:
- Transaction has Pre-Authorized but not Confirmed (settled), in order to release funds that have been reserved against an account when the transaction will no longer take place.
- Transaction has been done using PayTransaction but needs to be refunded/cancelled (e.g. when product has not been Kurvey Kiosk)
TCP API
# All commands and events use the following message format:
>> CommandName(id=num,param1=value1,param2=value2,paramN=valueN)

# Spaces inside the parentheses are ignored, except for string values. for example, the following command is legal:
>> GetVersion(id =127 , component = Reader )

## However, the following command will result in 2 space characters on the beginning of the first line of the Reader display:
>> ShowMessage(id=126 , line1= Test Line 1, line2=Test Line 2)
PAY TRANSACTION
SYNTAX
PayTransaction(id=<id>,amount=<amount>,currencyCode=<currency>, timeout=<timeoutSeconds>)
EXAMPLE
# Request
PayTransaction(id=125,amount=1.5,currencyCode=840,timeout=60)
# Response
TransactionComplete(id=125,status=OK,errorCode=0,errorDescription=Transaction has been executed successfully.,authorizationDetails(amountAuthorized=150,partialPan=476173******0119,cardType=VISA,Transaction_Reference=PYiljtHhrhS,Additional_Parameters(Authorization_Code=,Card_Hash=,Card_Reference=)))
| Parameter | Type | Description |
|---|---|---|
| id | Integer | Command ID |
| amount | Double | Amount to charge |
| currencyCode | String (Optional) | ISO 4217 code. example: 840 means $US |
| timeout | Integer | Maximum number of seconds to wait. If no card arrives within this time – return Timeout status. The call may take longer including service communication |
| productID | Integer | ID of the product selected by the consumer. This number will be saved in the server and available for reports. |
AUTHORIZE TRANSACTION
Preauthorise will function as a straight sale (PayTransaction) and will secure the full amount if the MCC code is not specifically approved for pre-authorisation transaction.
Please contact [email protected] to discuss your specific requirements.
SYNTAX
PreAuthorize(id=<id>,amount=<amount>,currencyCode=<currency>, timeout=<timeoutSeconds>)
EXAMPLE
>> PreAuthorize(id=124,amount=1.20,currencyCode=840,timeout=15)
<< (id=124,result=true)
| Parameter | Type | Description |
|---|---|---|
| id | Integer | Command ID |
| amount | Double | Amount to charge |
| currencyCode | String (Optional) | ISO 4217 code. example: 840 means $US |
| timeout | Integer | Maximum number of seconds to wait. If no card arrives within this time – return Timeout status. The call may take longer including service communication |
| productID | Integer | ID of the product selected by the consumer. This number will be saved in the server and available for reports. |
CONFIRM TRANSACTION
SYNTAX
ConfirmTransaction(id=<id>, transactionReference=<tr>,amount=<amount>,productID=<pid>)
EXAMPLE
>> PreAuthorize(id=14 ,amount=4.10,currencyCode=978,timeout=60)
<< TransactionComplete(id=14,status=OK,errorCode=0,errorDescription=,authorizationDetails(amountAuthorized=4.10,partialPan=523345xxxxxx0102,cardType=MASTERCARD,Transaction_Reference=e98ba9,Additional_Parameters(Authorization_Code=12AB34,Card_Hash=BsQdA1TgyEq=,Card_Reference=edc53435)))
| Parameter | Type | Description |
|---|---|---|
| id | Integer | Command ID |
| amount | Double | Amount to charge |
| currencyCode | String (Optional) | ISO 4217 code. example: 840 means $USD |
| timeout | Integer | Maximum number of seconds to wait. If no card arrives within this time – return Timeout status. The call may take longer including service communication |
| productID | Integer | ID of the product selected by the consumer. This number will be saved in the server and available for reports. |
VOID TRANSACTION
SYNTAX
VoidTransaction (id=<id>,transactionReference=<tr>)
EXAMPLE
>> VoidTransaction(id=21,transactionReference=84f57fe6-8dfc-e8)
<< (id=21,result=true)
| Parameter | Type | Description |
|---|---|---|
| id | Integer | Command ID |
| transactionReference | String | Transaction reference received from the transaction event. |
CANCEL TRANSACTION
SYNTAX
CancelTransaction(id=<id>)
EXAMPLE
>> CancelTransaction(id=122)
<< (id=122,result=OK)
<< TransactionComplete(id=122,status=Cancelled,errorCode=-1,errorDescription=user click oncancelbutton,authorizationDetails(amountAuthorized=1.20,partialPan=,cardType=,Transaction_Reference=,Additional_Parameters(AuthID=,Authorization_Code=,ReceiptID=,RRN=)))
Cancel the last transaction started by PayTransaction or by Pre-Authorize:
- If card was not presented yet, it will stop the Reader poll sequence (reader will stop waiting for a card).
- If card was already presented, but not completed yet, it will return ‘CannotCancel’.
- If transaction was already completed (after TransactionComplete event was sent), it will return ‘NoTransaction’
- In case ‘CannotCancel’ or ‘NoTransaction’, undoing the transaction can be done by sending Void command.
- In any case, Kurvey Kiosk will send a TransactionComplete event.
| Parameter | Type | Description |
|---|---|---|
| id | Integer | Command ID |
Other commands
GET KIOSK STATUS
SYNTAX
GetStatus(id=<id>)
EXAMPLE
>> GetStatus(id=1)
<< (id=1,result=Ready)
Gets kiosk status
| Parameter | Type | Description |
|---|---|---|
| id | Integer | Command ID |
SHOW MESSAGE
SYNTAX
ShowMessage(id=<id>,line1=<line1 text>,line2=<line2 text>)
EXAMPLE
>> ShowMessage(id=127,line1=Please Present,line2=Your Card)
<< (id=127,result=true)
Allows the application to show messages on Kurvey Reader display.
| Parameter | Type | Description |
|---|---|---|
| id | Integer | Command ID |
| line1 | String | Top line |
| line2 | String (Optional) | Bottom line |
LOG MESSAGE
SYNTAX
log(id=<id>,level=<level>,message=<message>)
EXAMPLE
>> log(id=127,level=5,message=Hello world)
<< (id=127,result=true)
Writes a message in agent log file. Useful to keep track of references or other messages.
| Parameter | Type | Description |
|---|---|---|
| id | Integer | Command ID |
| level | Integer | 0=Skip, 1=Error, 2=Info, 5=Debug |
| message | String | Bottom line |
GET VERSION
SYNTAX
GetVersion(id=<id>,component=<component>)
EXAMPLE
>> GetVersion(id=127,component=kagent)
<< (id=127,result=kagent_v0_7_0_37)
Returns the version for a given component.
| Parameter | Type | Description |
|---|---|---|
| id | Integer | Command ID |
| component | String | Which component version to request |
GET KIOSK ID
SYNTAX
GetKioskID(id=<id>)
EXAMPLE
>> GetKioskID(id=128)
<< (id=128,result=3827923723743783497823982)
Returns the Kurvey Kiosk identifier.
| Parameter | Type | Description |
|---|---|---|
| id | Integer | Command ID |
TCP Events
SYNTAX
ReaderMessageEvent(index=<index>)
EXAMPLE
# Will be sent when the reader presents the “Authorizing” message. This event does not require any acknowledgement from the kiosk host application.
<< ReaderMessageEvent(index=24)
Sent by Kurvey Kiosk when the display message on the Reader has changed. This event can be used to synchronise the Kurvey Kiosk Agent with the Reader state.
| Parameter | Type | Description |
|---|---|---|
| index | String | The index of the message, two ASCII characters representing the Hex value according to the Message Index table below. |
MAIN STATE
| Field | Description |
|---|---|
| 0x00 | Blank screen |
| 0x01 | Present card |
| 0x11 | Welcome |
| 0x23 | Card read OK |
| 0x04 | Please remove card |
| 0x0D | Approved sign |
TRANSACTION RECOVERY STATES
| Field | Description |
|---|---|
| 0x05 | Please present one card only |
| 0x03 | RFU (Reserved for future usage) |
| 0x27 | Read error Please try again |
STATELESS MESSAGES
| Field | Description |
|---|---|
| 0x12 | Thank You |
| 0x15 | Please Use Another Card |
| 0x19 | Please Wait |
| 0x1A | RFU (Reserved for future usage) |
EMV ONLINE TRANSACTION RESULTS STATES
| Field | Description |
|---|---|
| 0x24 | Authorizing Please wait |
| 0x06 | Approved |
| 0x09 | Not Approved |
EMV OFFLINE TRANSACTION RESULTS STATES
| Field | Description |
|---|---|
| 0x07 | Approved |
| 0x08 | Not Approved |
EMV TRANSACTION ERROR STATES
| Field | Description |
|---|---|
| 0x1E | Timed Out |
| 0x25 | Communication Failure |
| 0x26 | RFU (Reserved for future usage) |
| 0x0A | Terminated |
| 0x0B | RFU (Reserved for future usage) |
| 0x0C | RFU (Reserved for future usage) |
Transaction status
| Code | Type | Detail |
|---|---|---|
| Confirm | Integer | Transaction success |
| Confirm_Declined | Integer | Transaction declined |
| Authorize | Integer | Authorisation succeeded |
| Authorize_Declined | Integer | Authorisation declined |
Error codes
| Code | Type | Detail |
|---|---|---|
| 0 | Integer | Success |
| 1 | Integer | Error |
| 2 | Integer | User cancelled or transaction aborted |
JSON API
Configuration should allow binding to all eth interfaces. A host name configuration can also be defined.
Host application will make a HTTP POST request to the Kurvey Kiosk Agent listening on 0.0.0.0 port 8080. The Kurvey Kiosk Agent will receive the JSON instructions and proceed to the next step if a valid.
Once the request has been initiated the Kurvey Kiosk Agent connects to the attached device and establish a protocol connection according to the devices documentation and will initiate a payment request for a contactless EMV transaction type.
Once the transaction is initiated, agent takes control until payment request has been completed, declined or failed. While not receiving any input, a timeout error will occur automatically after 45 seconds.
GET VERSION RESPONSE:
{
  "version": "0.7.0",
  "build": "37"
}
GET VERSION
Returns the version numbers for the current agent binary.
Type: GET
Path: /version
PAY TRANSACTION EXAMPLE:
{
  "amount": 100,
  "currency": "GBP"
}
PAY TRANSACTION
Type: POST
Path: /v1/pay
| Parameter | Type | Description |
|---|---|---|
| amount | Double | Amount to charge in cents (100 = £1.00) |
| currency | String (Optional) | ISO 4217 code. example: 840 means $USD |
AUTHORIZE TRANSACTION EXAMPLE:
{
  "amount": 100,
  "currency": "GBP"
}
AUTHORIZE TRANSACTION
Preauthorise will function as a straight sale (PayTransaction) and will secure the full amount if the MCC code is not specifically approved for pre-authorisation transaction.
Please contact [email protected] to discuss your specific requirements.
Type: POST
Path: /v1/authorize
| Parameter | Type | Description |
|---|---|---|
| amount | Double | Amount to charge in cents (100 = £1.00) |
| currency | String (Optional) | ISO 4217 code. example: 840 means $USD |
CONFIRM TRANSACTION
CONFIRM TRANSACTION EXAMPLE:
{
  "transactionID": "298f23fj298j",
  "amount": 100,
  "currency": "GBP",
  "productID": 2
}
Type: POST
Path: /v1/confirm
| Parameter | Type | Description |
|---|---|---|
| transactionID | String | Previously authorised transaction reference |
| amount | Double | Amount to confirm (equal or lower than authorised amount) |
| currency | String | ISO 4217 code. example: 840 means $USD |
| productID | String (Optional) | Assigned product identifier |
VOID TRANSACTION
EXAMPLE
{
  "transactionReference": "298f23fj298j",
}
Type: POST
Path: /v1/void
| Parameter | Type | Description |
|---|---|---|
| transactionReference | String | Transaction reference |
Other commands
GET STATUS RESPONSE:
{
  "status": "idle"
}
GET STATUS
Returns the current status for the payment service.
Type: GET
Path: /v1/status
RESET EXAMPLE:
# WARNING: Doesn't provide any response.
# Request will be closed inmediately or as soon
# as current payment has finished.
RESET AGENT
Forces the agent to exit. Configured system service, should restart automatically.
Type: POST
Path: /v1/reset
REBOOT EXAMPLE:
# WARNING: Doesn't provide any response.
# Request will be closed inmediately or as soon
# as current payment has finished.
REBOOT HOST
Reboots the operating system available on the telemetry box where the agent is running.
Type: POST
Path: /v1/reboot
Plugins
Wordpress

Installation
Plugin website: WordPress Plugin
Automatic Installation
- When you are logged in to your WordPress dashboard, navigate to the Plugins menu.
- Click Add New button.
- In the search field, type Kashing and click Search Plugins.
- After you find our plugin in the search results, click on it.
- In the popup window, you will see plugin details along with the Install Now button. Click it.
- When the plugin installation finishes, activate it. You will see a new side menu item: Kashing.
Manual Installation
- First, download the plugin files by clicking the blue Download button located at the top right of this page.
- Log in to your WordPress dashboard and navigate to Plugins menu.
- Click Add New button.
- Click Upload Plugin button.
- Click Choose file button and select the plugin .zip file you downloaded in Step 1. When the file is selected, click Install Now button.
- When the plugin installation finishes, activate it. You will see a new side menu item: Kashing.
Plugin Configuration
- Navigate to Kashing / Settings menu (located in your WordPress admin dashboard, in the sidebar navigation).
- Click the Retrieve Your Kashing API Keys button – that will take you to the latest version of Kashing documentation where you will be explained how to retrieve the plugin configuration data.
- After you receive the configuration data in Step 2, fill all 4 fields in the Configuration tab: Test Merchant ID, Test Secret Key, Live Merchant ID, Live Secret Key. The first two are going to be used only if the Test Mode is enabled. When you’re done, click Save Changes button.
- For test purposes, it is recommended to use the Test Mode.
Changing the Currency
- Navigate to Kashing / Settings menu and click the General tab.
- Choose your desired currency from the Choose Currency dropdown menu.
Payment Success & Failure Pages
By default, upon plugin activation, Kashing automatically creates two plugin related pages: Payment Success and Payment Failure. They are being automatically assigned in Kashing / Settings / General tab. You may change those pages content as you wish. You may, of course, set them to be any other page.
Creating a Payment Form
- Navigate to the Kashing menu and click Add New Form button.
- Enter the form title and fill out the required fields: Amount and Description.
- When you’re done, save the form by clicking the Publish button on the right.
Inserting a Payment Form
- Edit the page or post you wish to insert the payment form on.
- Right above the WYSIWYG content editor (next to the Add Media button), you will find Add Kashing Form button. Click it.
- A popup window will appear where you will be presented with a dropdown list of payment forms you previously created.
- Choose the one you need and click the blue OK button.
- A form shortcode will be automatically inserted into your page/post content in a form like: [kashing_form form_id=”XX”] where XX is a unique ID of that particular form.
- Save your page/post.
WooCommerce

Installation
Plugin website: WooCommerce Plugin
Automatic Installation
- When you are logged in to your WordPress dashboard, navigate to the Plugins menu.
- Click Add New button.
- In the search field, type Kashing WooCommerce and click Search Plugins.
- After you find our plugin in the search results, click on it.
- In the popup window, you will see plugin details along with the Install Now button. Click it.
- When the plugin installation finishes, activate it.
Manual Installation
- First, download the plugin files by clicking the blue Download button located at the top right of this page.
- Log in to your WordPress dashboard and navigate to Plugins menu.
- Click Add New button.
- Click Upload Plugin button.
- Click Choose file button and select the plugin .zip file you downloaded in Step 1. When the file is selected, click Install Now button.
Plugin Configuration
- Navigate to WooCommerce / Settings menu (located in your WordPress admin dashboard, in the sidebar navigation).
- Navigate to the “Checkout” tab and then navigate to “Kashing” tab. This is the main Kashing WooCommerce plugin settings page.
- Click the “API Documentation” link – that will take you to the latest version of Kashing documentation where you will be explained how to retrieve the plugin configuration data.
- After you receive the configuration data in Step 3, fill all 4 fields in the Configuration tab: Test Merchant ID, Test Secret Key, Live Merchant ID, Live Secret Key. The first two are going to be used only if the Test Mode is enabled. When you’re done, click Save Changes button.
- For test purposes, it is recommended to use the Test Mode.
- For additional debugging data you may go ahead and enable “Logging”. You will be able to see the plugin logs in WooCommerce / Status / Logs -> Kashing.
- After the plugin is correctly set up, you will be able to see a new gateway at the WooCommerce order checkout page.
Currency Information
Please keep in mind that as or now, Kashing Payments support only these three currencies: USD, GBP and EUR. You won’t be able to use the Kashing gateway with any other currency.
Changing the checkout labels
You may change the text displayed to your customers on the Checkout page regarding the Kashing Payments gateway. Just visit the gateway settings (WooCommerce / Settings / Checkout -> Kashing) and change the Title and Description fields.
Drupal
Plugin website: Drupal Plugin
Features
- Integrate your Kashing Smart Payment Technology account with your Drupal website and allow your site visitors & clients to pay directly on your website.
- Build unlimited payment forms – each with a different transaction amount and description – so you may easily recognise them in your Kashing transaction history.
- Display your payment form in chosen page region using block.
- Easily place payment forms anywhere on your website using shortcodes (module required).
- Debug and test the integration with a convenient ”Test Mode” before you go live.
- Easily change the transaction currency.
- Fully customize the payment failure and success pages.
Installation
- Download the Kashing module (bottom of this page).
- Login to your page as an administrator and navigate to Extend menu.
- Choose the +Install new module option. You will be redirected to module installation page.
- Either upload previously downloaded module .zip file or just paste the module URL. You can also just unzip the kashing module folder and place it directly in /modules/ directory of your page.
- Go back to Extend menu. In a Filter by name or description field type in Kashing or scroll the page down to the Kashing module section.
- Activate selected module elements (Kashing itself is the main one and is required by the other elements) by marking them out and click an Install button.
- If you are not able to mark any of the module elements verify the required modules (click on the module description).
- After the CKEditor button or Shortcodes module selection make sure to follow up the instructions under Activating shortcodes functionality and/or Activating CKEditor button functionality section of this page.
- Do not forget to clear cache.
- After the installation, selected module elements should be available.
Module elements
- Kashing - the main standalone module providing Kashing payments functionality. It allows to configure the payments (API keys) and to create payment form in a separate block.
- Kashing Shortcodes - provides Kashing shortcode tag functionality. Just put down [kashing id=[ID] /] in your node body, where [ID] refers to previously created form ID (block machine name). Note: the shortcodes module is required.
- Kashing CKEditor button - adds the Kashing shortcode button to CKEditor, which allows to easily choose one of the created forms and place a shortcode directly in selected node.
Kashing module configuration
- Navigate to Extend/Kashing and under the module details click on Configure button. Alternatively go to Administration page and you will find Kashing Payments Settings under the Index tab.
- Click the Retrieve Your Kashing API Keys link (Configuration tab) – that will take you to the latest version of Kashing documentation where you will be explained how to retrieve the module configuration data.
- After you receive the configuration data, fill all 4 fields in the Configuration tab: Test Merchant ID, Test Secret Key, Live Merchant ID, Live Secret Key. The first two are going to be used only if the Test Mode is enabled. When you’re done, click Save Settings button.
- For test purposes, it is recommended to use the Test Mode.
- To change the currency or to create success and failure pages select the General tab.
- Choose your desired currency from the Choose Currency dropdown menu.
- Design the look of both the success and failure page in a standard way using CKEditor. Once again save changes.
Creating a Payment Form
- Navigate to Add New Form tab under the Kashing settings (Similarly to step 1 of Kashing module configuration instruction).
- Enter the form title and fill out the required fields: Amount and Description.
- The Form ID field fills in by itself but you can change it too. Just remember to use only small letters, numbers and underscore symbol. The Form ID is used in a shortcode functionality to identify created forms.
- When you’re done, save the form by clicking Add New Form button.
Editing Payment Forms
- Navigate to Edit Forms tab under the Kashing settings (Similarly to step 1 of Kashing module configuration instruction).
- If there are any forms you will see the ID, name, amount and description of all available forms.
- To edit a form just click on Edit option associated with the table row. You will be redirected to a block layout edition page.
- To delete a form click on the Delete option. Confirm by clicking on Remove button.
- To delete multiple forms at once mark out chosen rows checkboxes and click on Delete Forms button.
Activating shortcodes functionality
- To enable the shortcodes functionality download, install and activate shortcode module.
- Navigate to Configuration / Text formats and editors.
- Choose one of the CKEditor variants by clicking the Configure button under the Operations column.
- Make sure that Shortcodes checkbox under the Enabled filters is selected
- Scroll down to the Filter settings section and varify if the Enable Kashing shortcode is checked.
- If necessary save changes by clicking Save configuration button.
- Now you are able to use [kashing id=[ID] /] shortcode. Just change the ID to previously created form ID (machine name).
Activating CKEditor button functionality
- Navigate to Configuration / Text formats and editors.
- Choose one of the CKEditor variants by clicking the Configure button under the Operations column.
- In the Toolbar Configuration section drag and drop Kashing button to the desired place in CKEditor Active toolbar.
- Save changes by clicking Save configuration button which can be find at the bottom of the page.
- You should now be able to see the Kashing button during a content edition. If not make sure you are using a correct Text format.
Magento
Plugin website: Magento Plugin
Please get in touch with [email protected] for information about Magento integration.
Guides
Here you will find documentation regarding various topics relating to the Kashing service.
Activate E-commerce
Kashing's e-commerce option automates the payment process and allows you to use various options in taking payments.
If you have previously set up a Kashing account, it’s easy to start taking online payments today
- Set up your payment policy
- Update your T&Cs
- Switch on e-commerce
- Apply your discount code
SET UP YOUR PAYMENT POLICY
Log into your Kashing account:
- Select Organisation from the menu bar.
- Select Payment policy from the tabs.
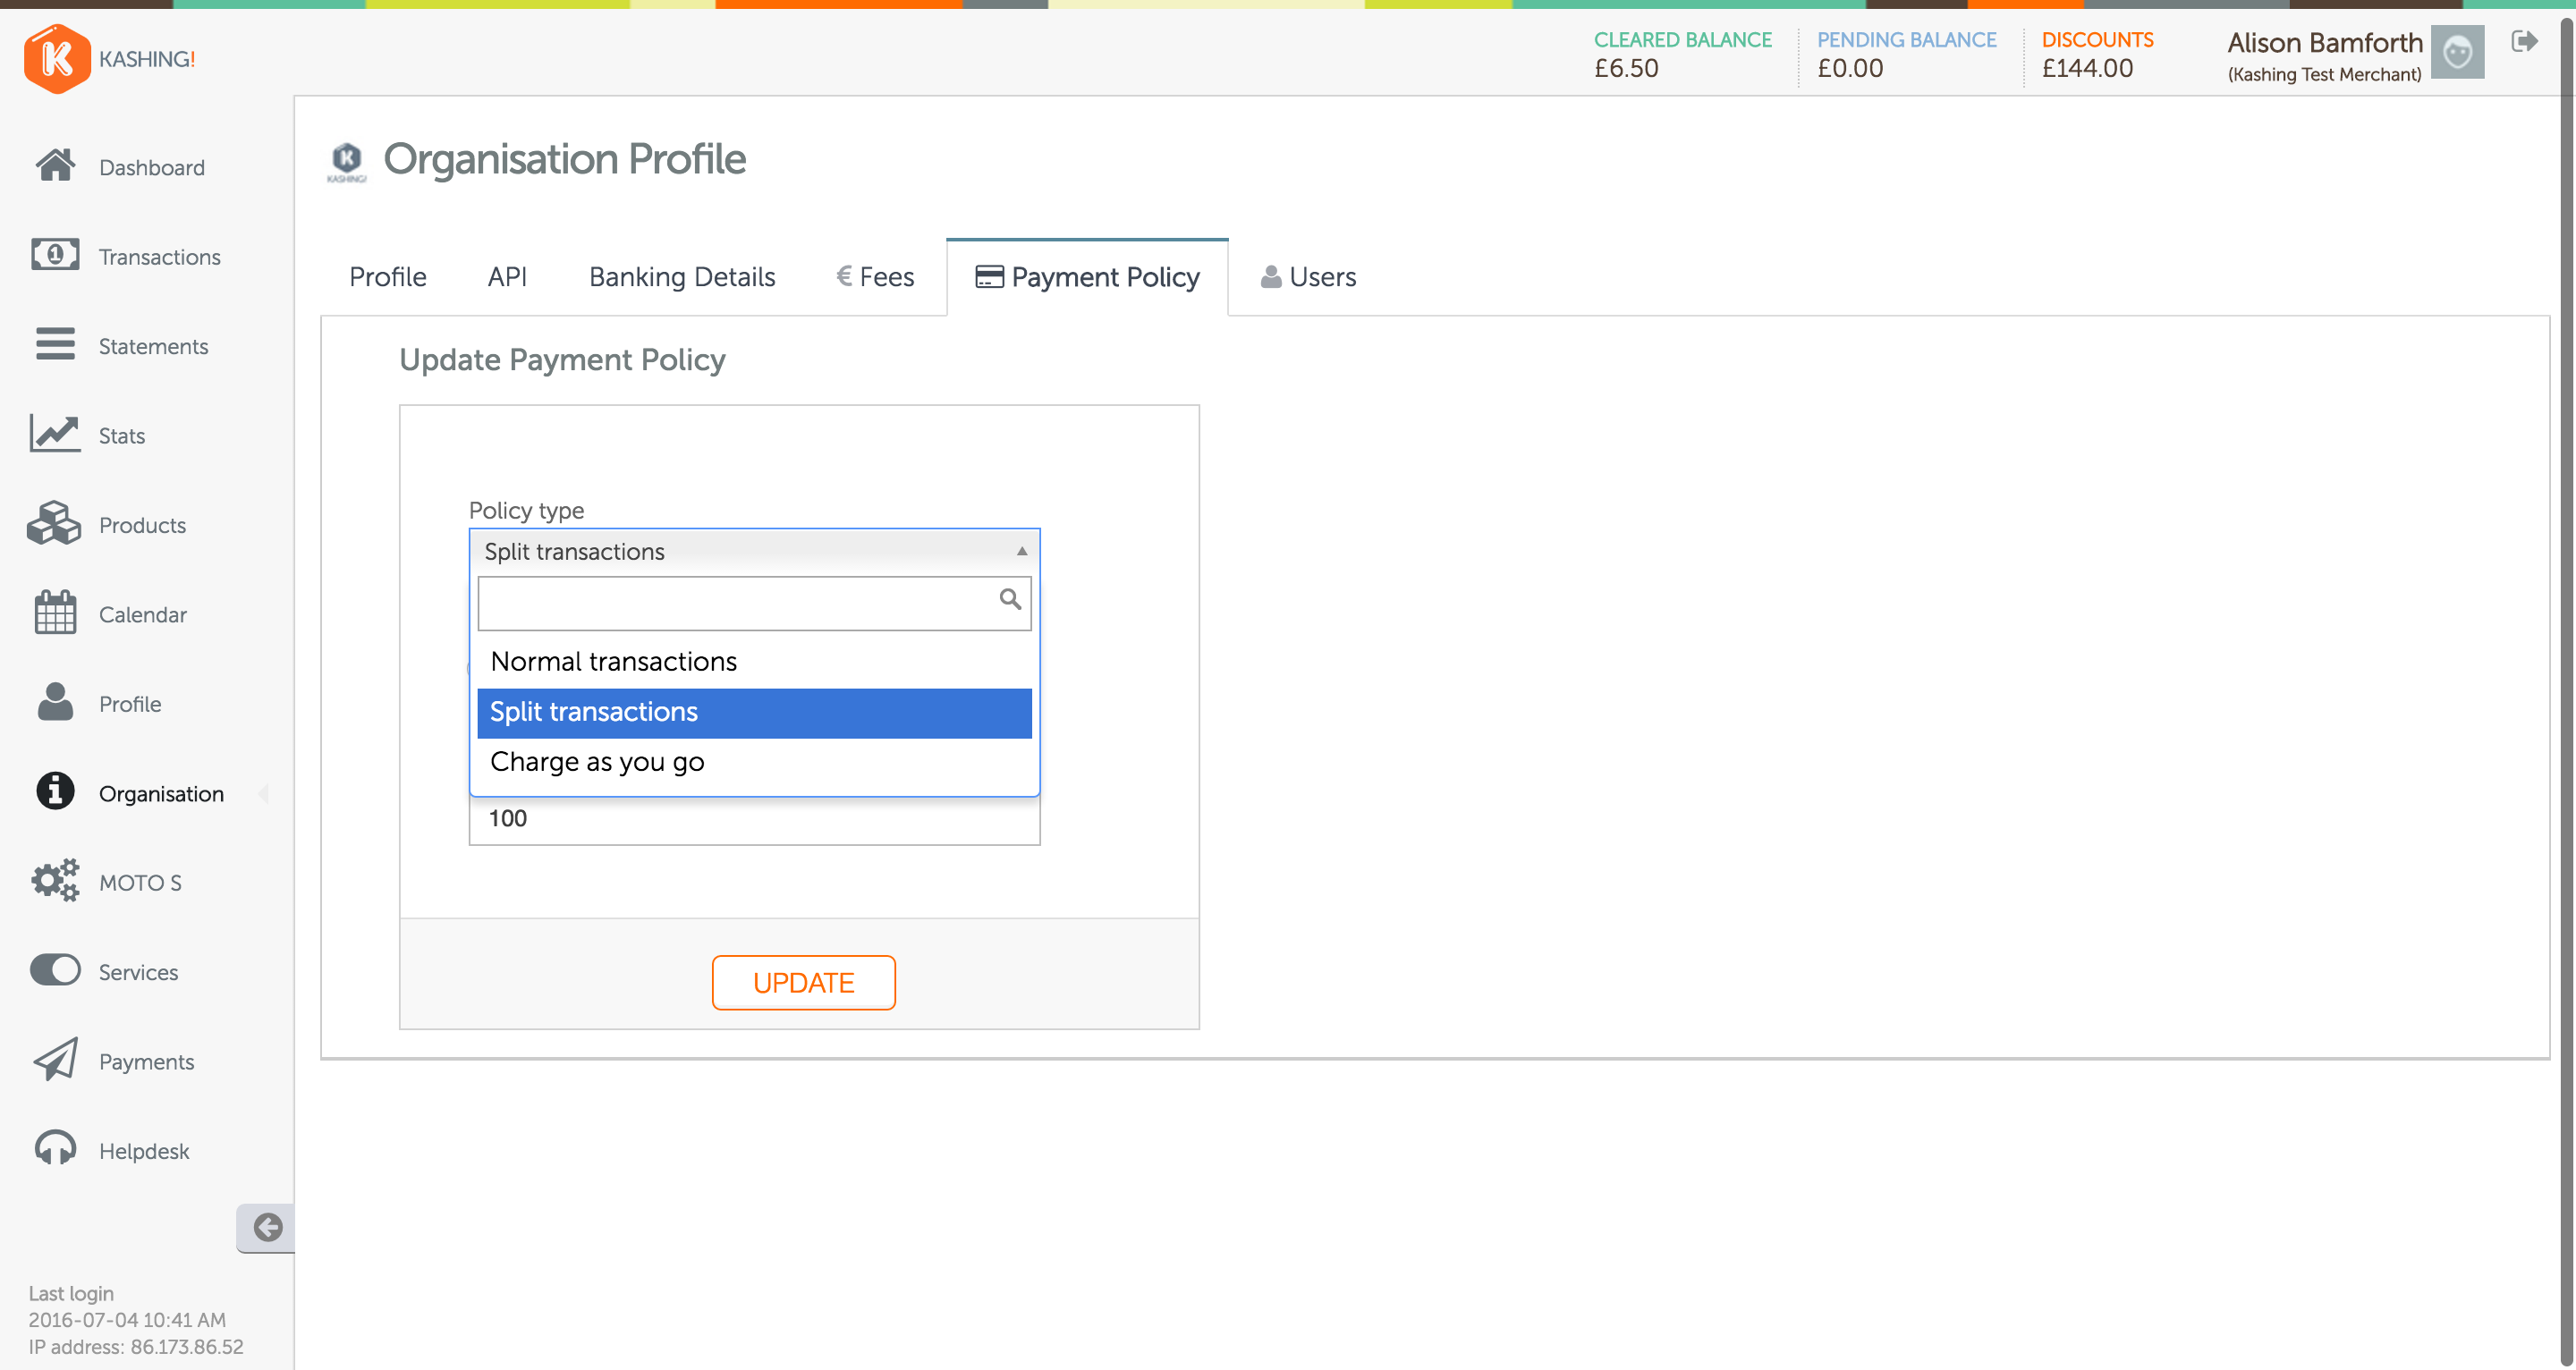
- Select a policy type from the dropdown list:
a. Normal Transactions: The full payment is taken at the time of booking.
b. Split Transactions: A deposit is taken at the time of booking followed by the final balance on the date set in Guestlink (see next section). Choose whether to take a percentage of the total bill (eg 50%) or a flat rate (eg '£'50) and enter the amount.
c. Charge as you go: Card details are secured in an encrypted form but the card is not charged. The card details are validated at the time of booking to ensure that the number is valid, the card hasn't been reported lost or stolen etc. The card can be charged one or more times for any amount and at any time as necessary. - Click Update.
Guestlink Integration
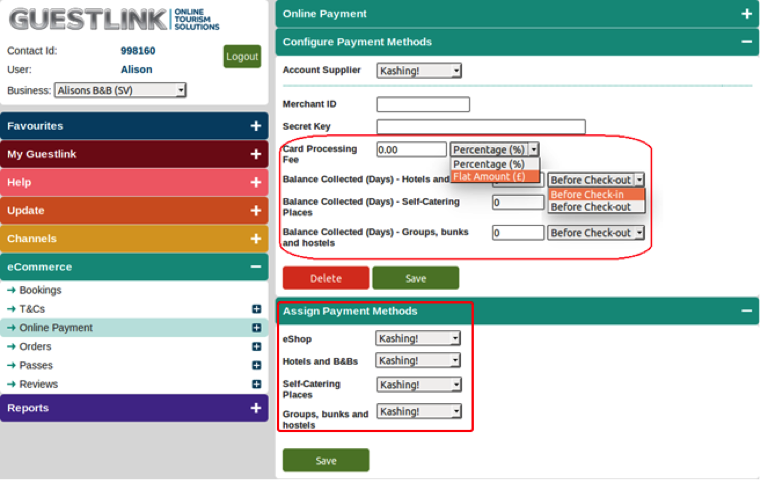
Clients wishing to integrate their Guestlink services with Kashing should follow the below mentioned procedure:
- Go to eCommerce > Online Payment
- Select Kashing from the Account Supplier dropdown
- Optionally add a Card Processing Fee as a percentage or a flat rate
- If you selected a Split Payment policy, use the Balance Collected boxes to set when the final balance will be taken for each type of accommodation.
- Click Save
- Select Kashing from the dropdown box(es) under Assign Payment Methods
Update your T&Cs:
- Go to eCommerce > T&Cs
- Ensure that your terms and conditions accurately describe your payment policy.
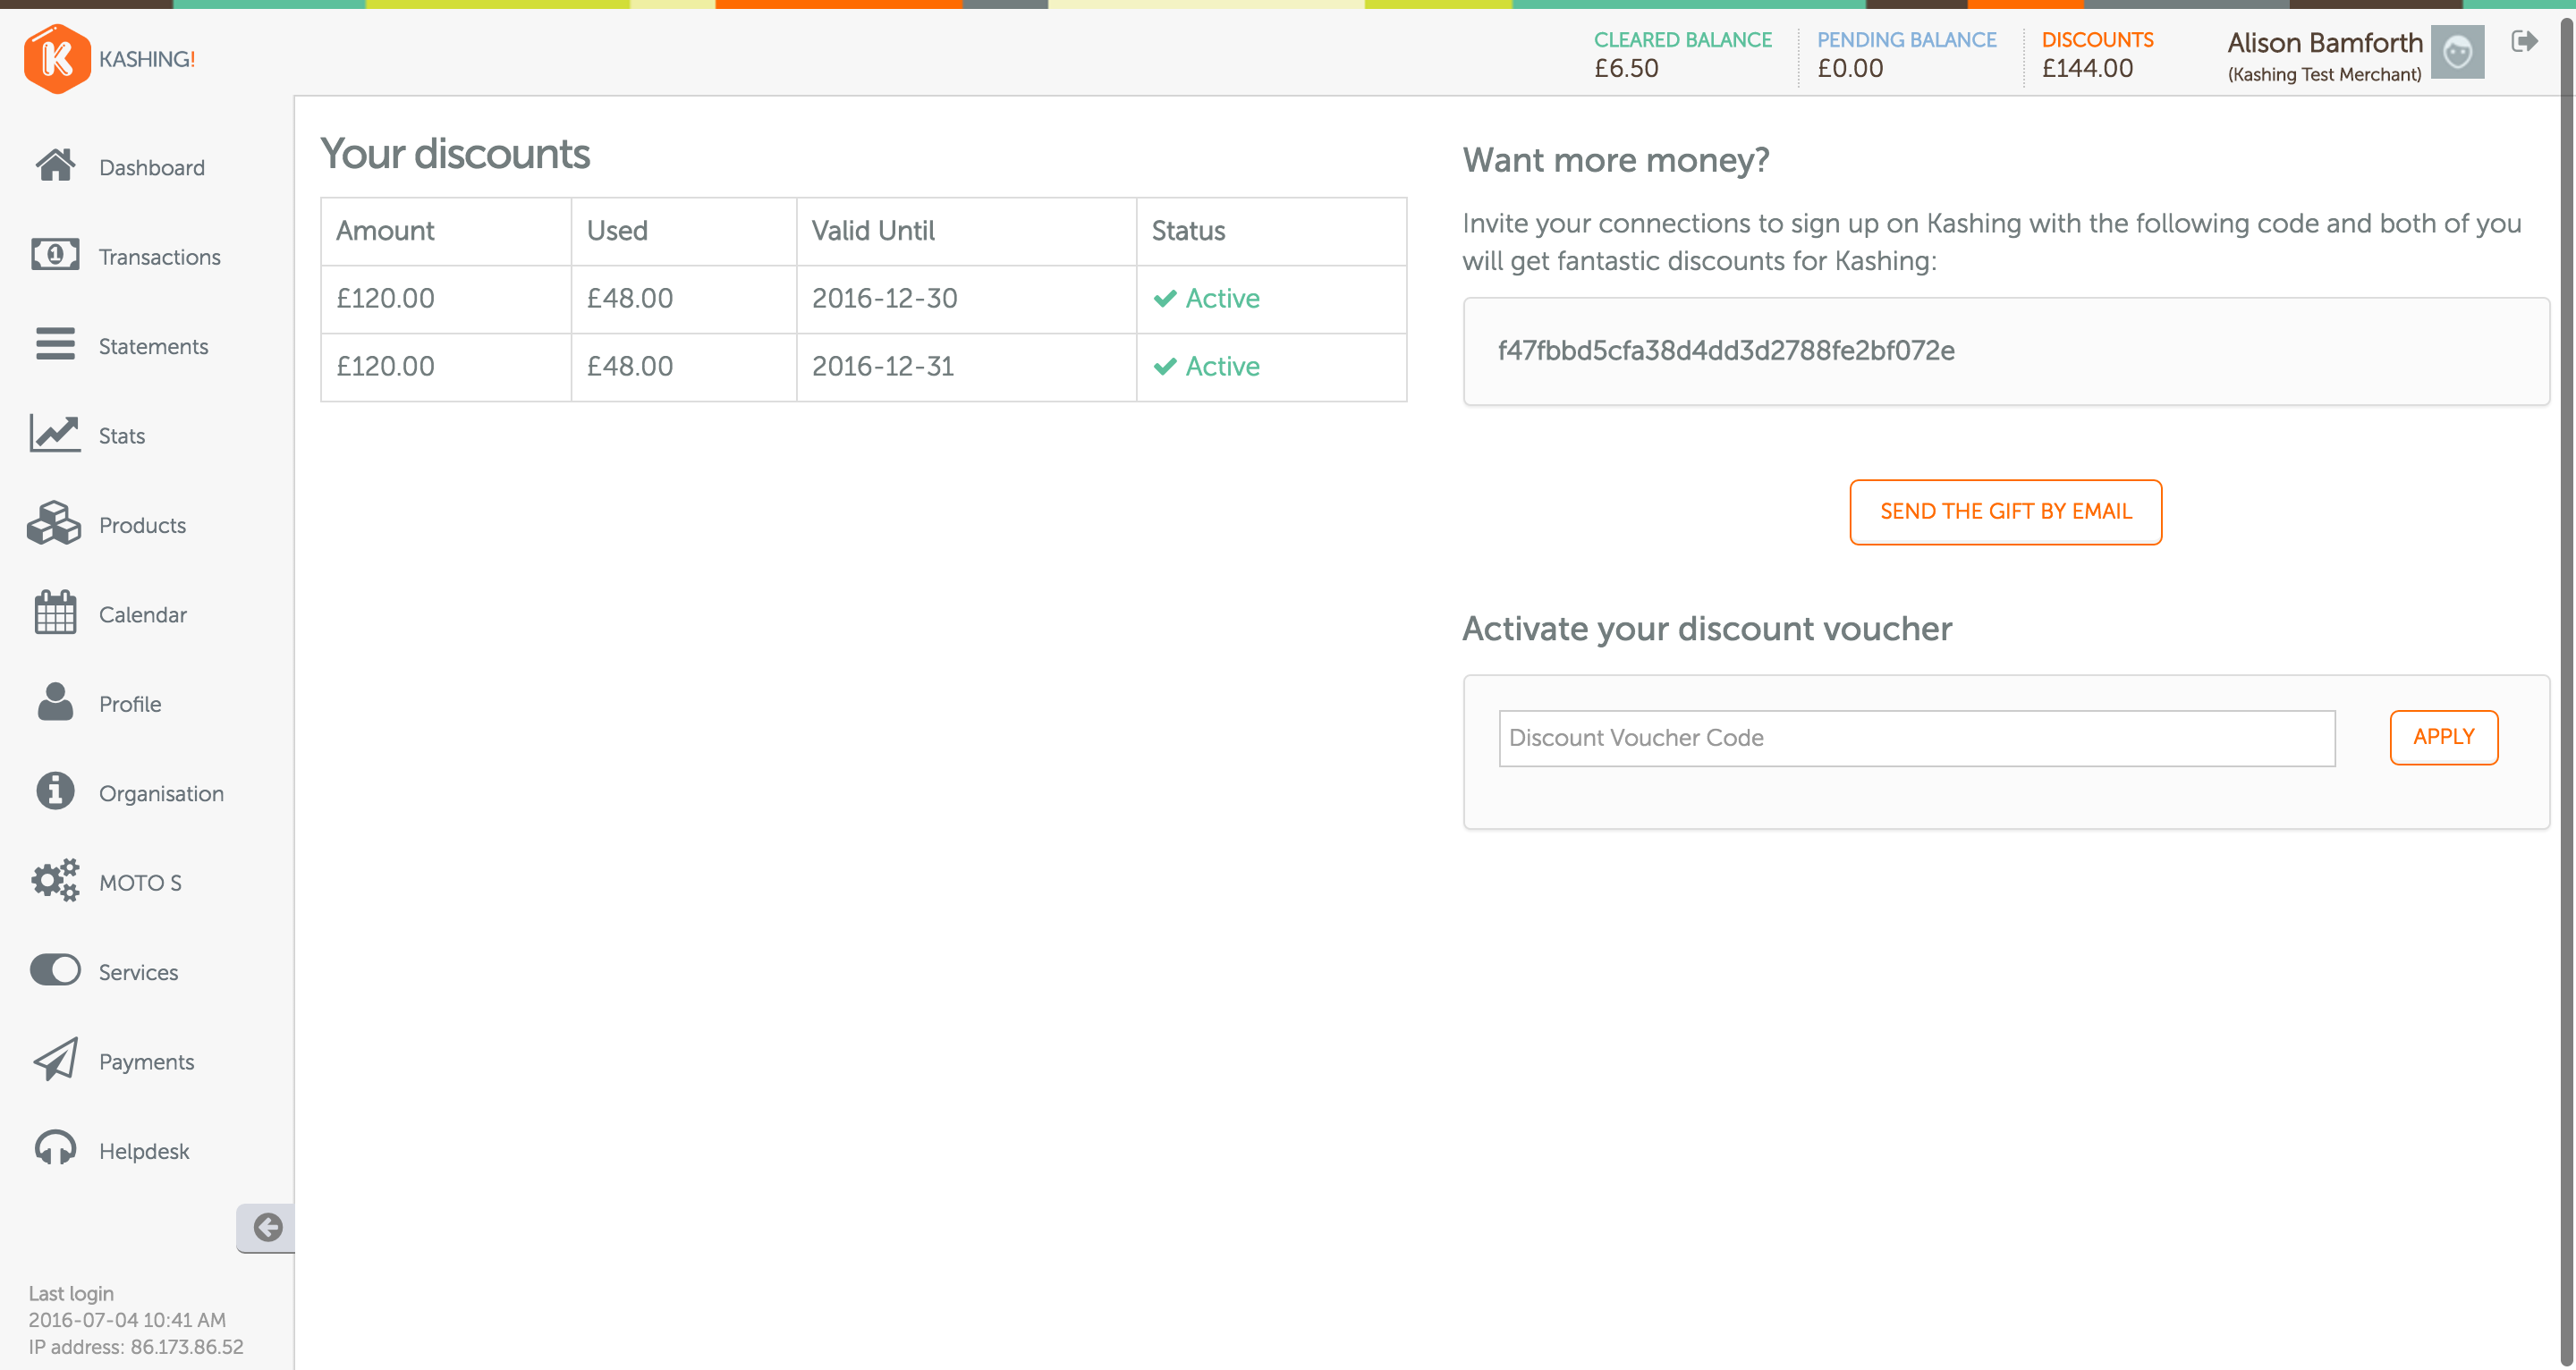
Discount Vouchers
If you have received a voucher code and want to apply it please follow the following steps to activate your voucher:
- Click Discounts at the top right
- Enter the voucher code
- Click Apply
Future Payments
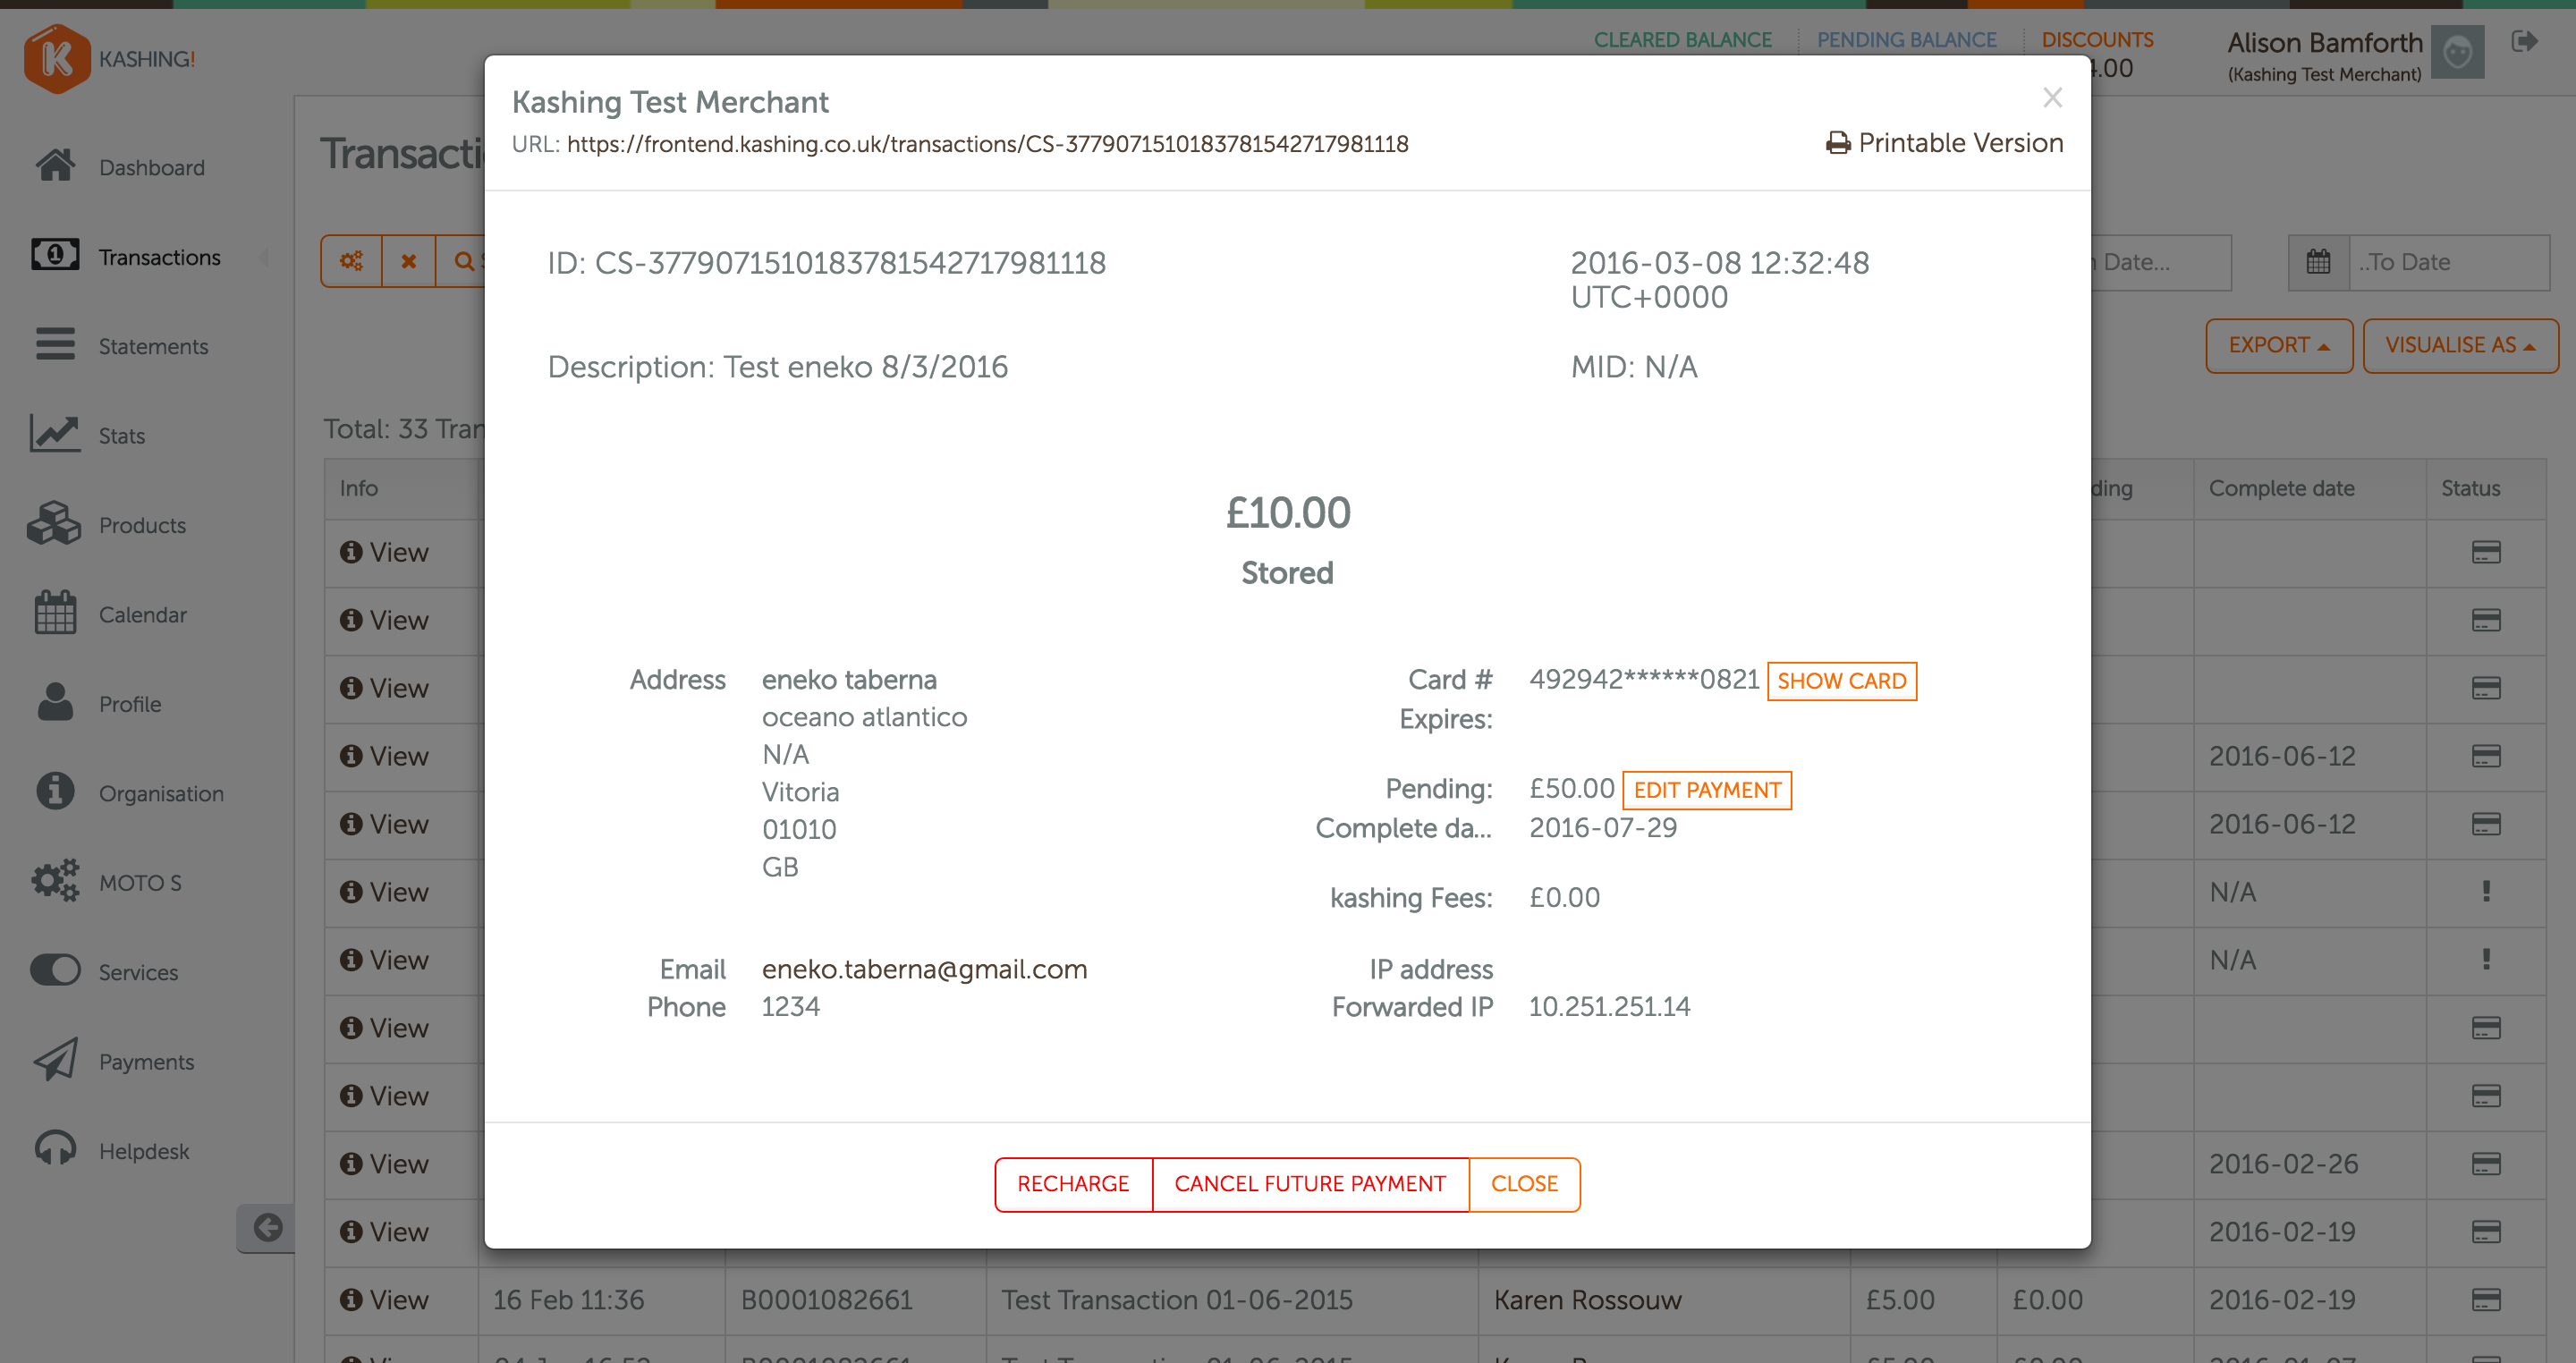
If you have selected a Split Payments policy, a deposit is taken at the time of booking and the balance payment is scheduled for the date you set in Guestlink (see How do I Activate E-Commerce?). You may wish to cancel this future payment if a guest prefers to pay by another method, or amend it if the guest changes their booking date or the final balance changes (guest stays an extra night, discount rate applied).
- Select Transactions from the menu bar
- Click on the relevant Id (use the search option if necessary
To cancel a future payment:
- Click Cancel Future Payment button
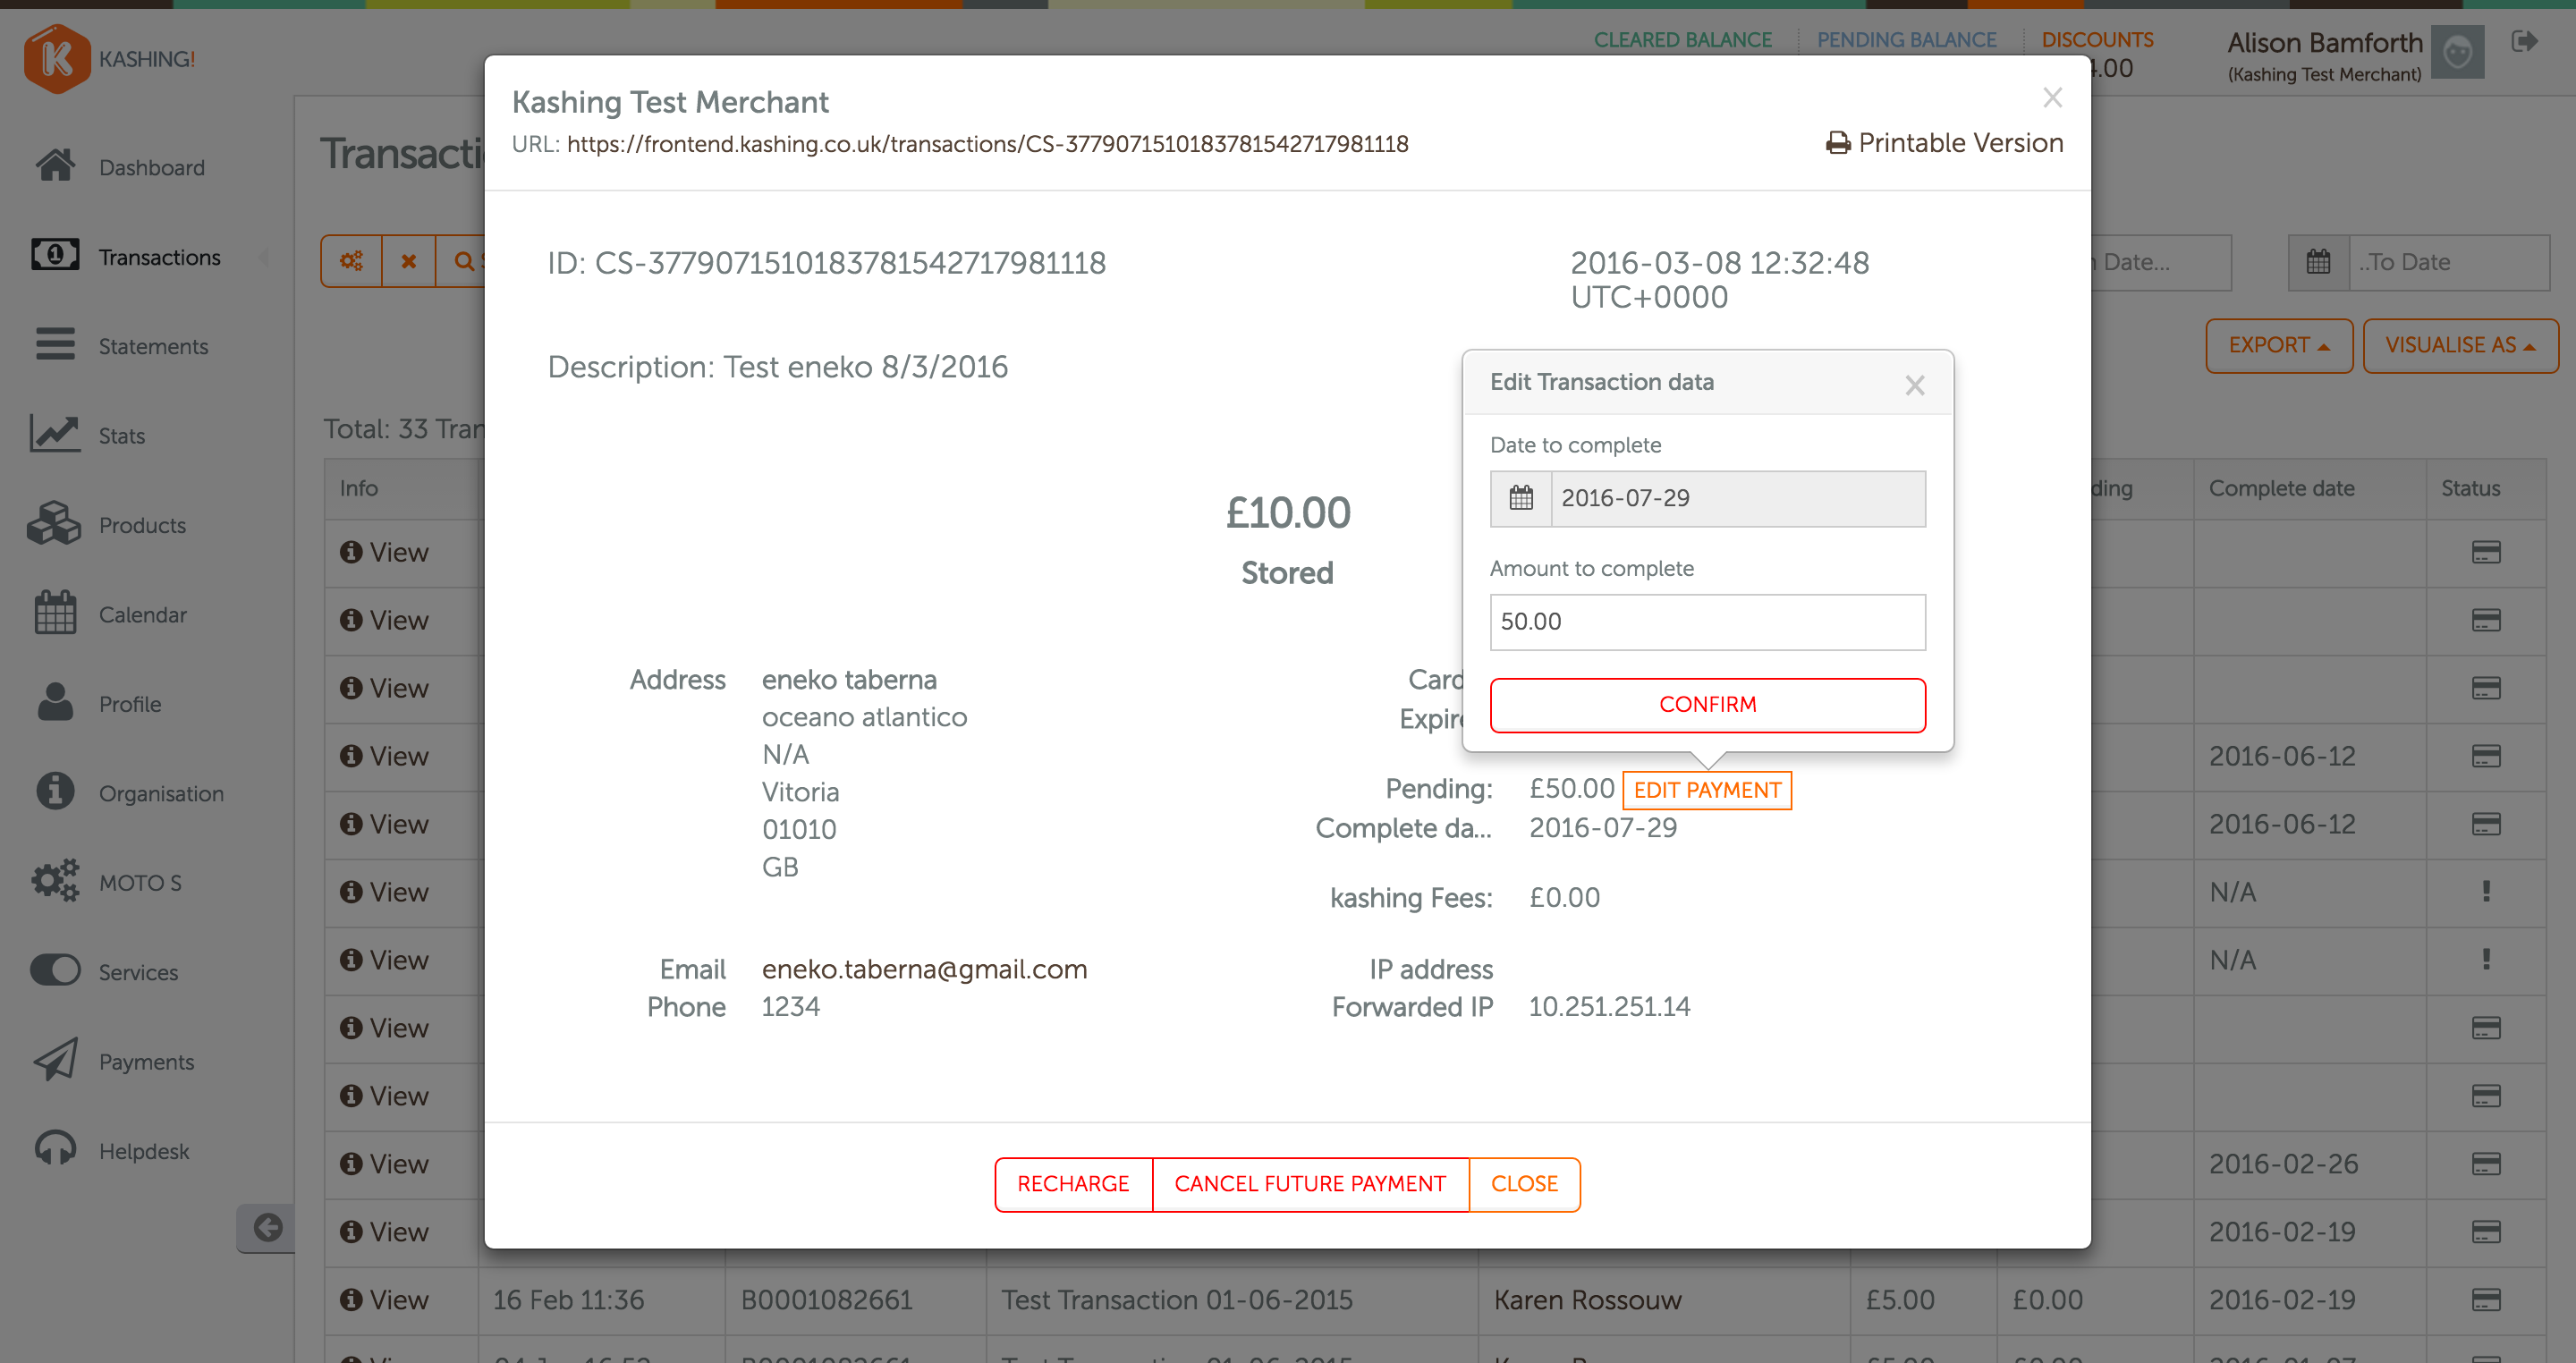
To edit a future payment:
- Click Edit Payment
- Edit the date the payment should be made or amount to be charged as required
- Click Confirm
Payment Requests
If a guest is booking over the phone or by email, the most secure way of taking their card details is to use the payment request option. You generate a secure link and email to the guest who then uses it to enter their card details rather than reading them over the phone or writing them in an email.
Generating a payment request:
- Select Payments from the menu bar
- Click Generate a Payment Request Link
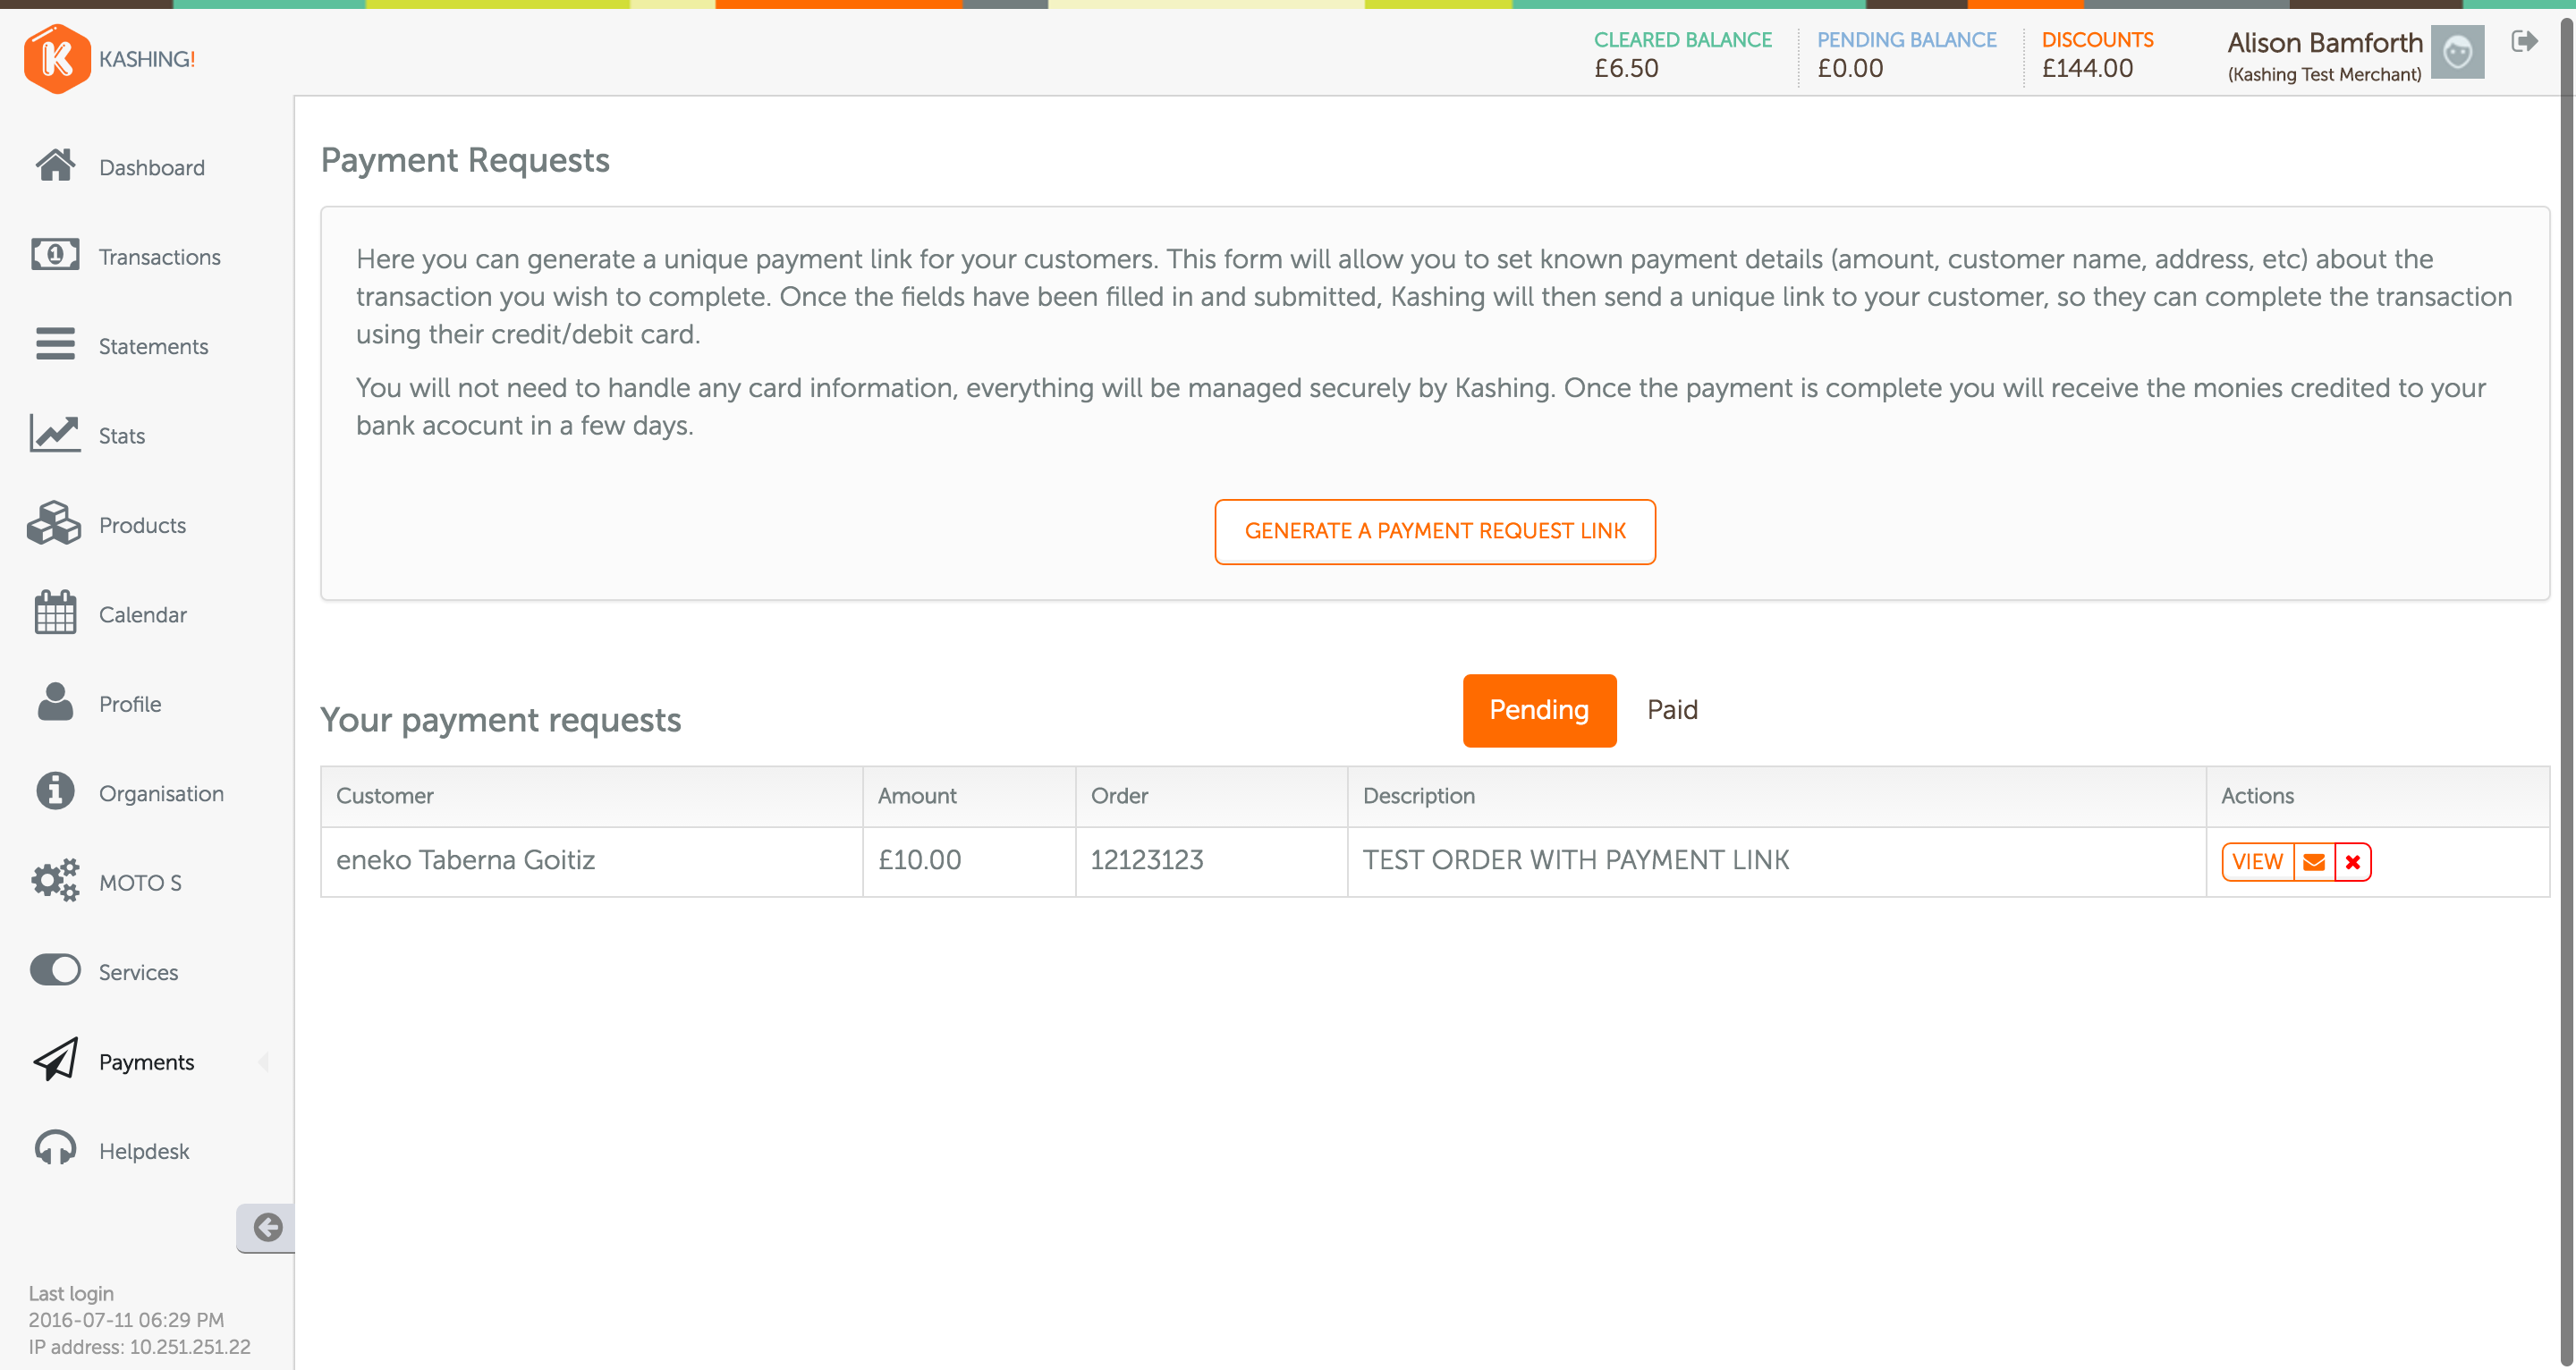
- Complete the form (note that some fields are mandatory)
- Tick Mail the payment link to the customer
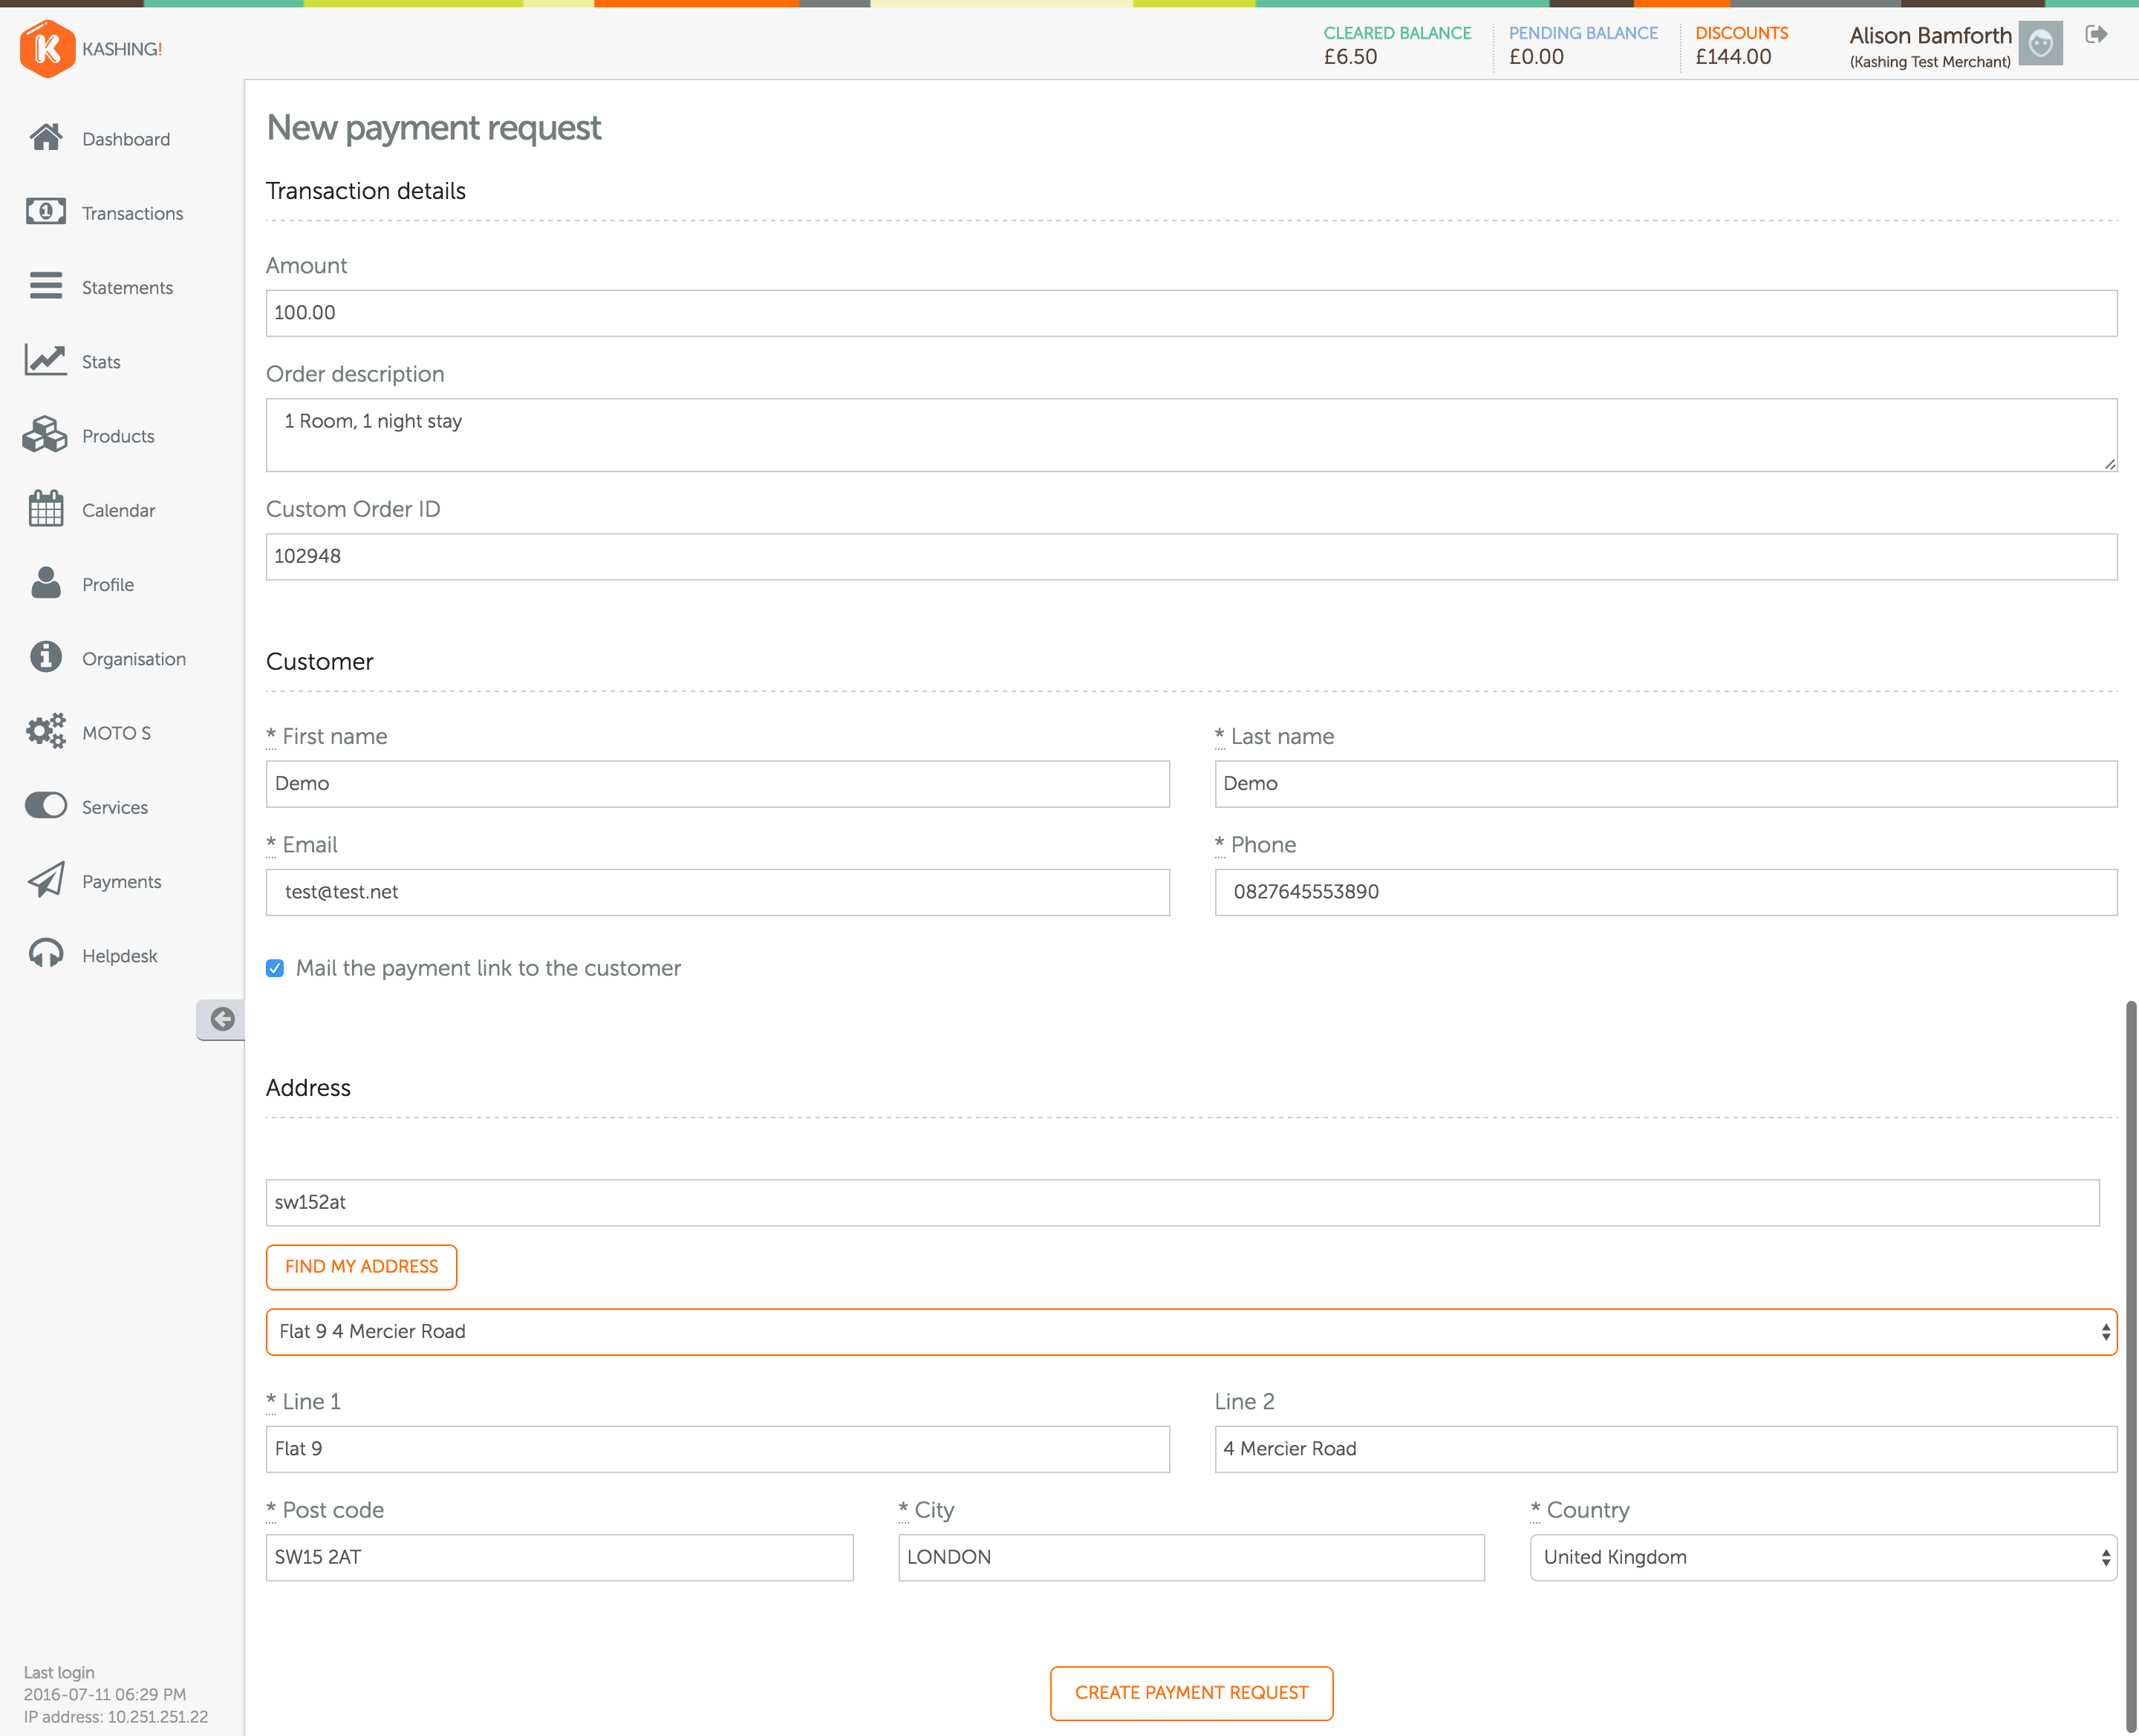
- Click Create Payment Request
Recharge Customer
The recharge facility allows you to take an additional amount from a customer's card if they take extras such as dinner, parking or attraction tickets during their stay, are a no-show or in the case of loss or damage.
- Select Transactions from the menu bar
- Click on the relevant Id (use the search option if necessary
- Click Recharge
- Edit the description of what the payment is for (this appears on the customer's bank statement) if necessary.
- Click Confirm
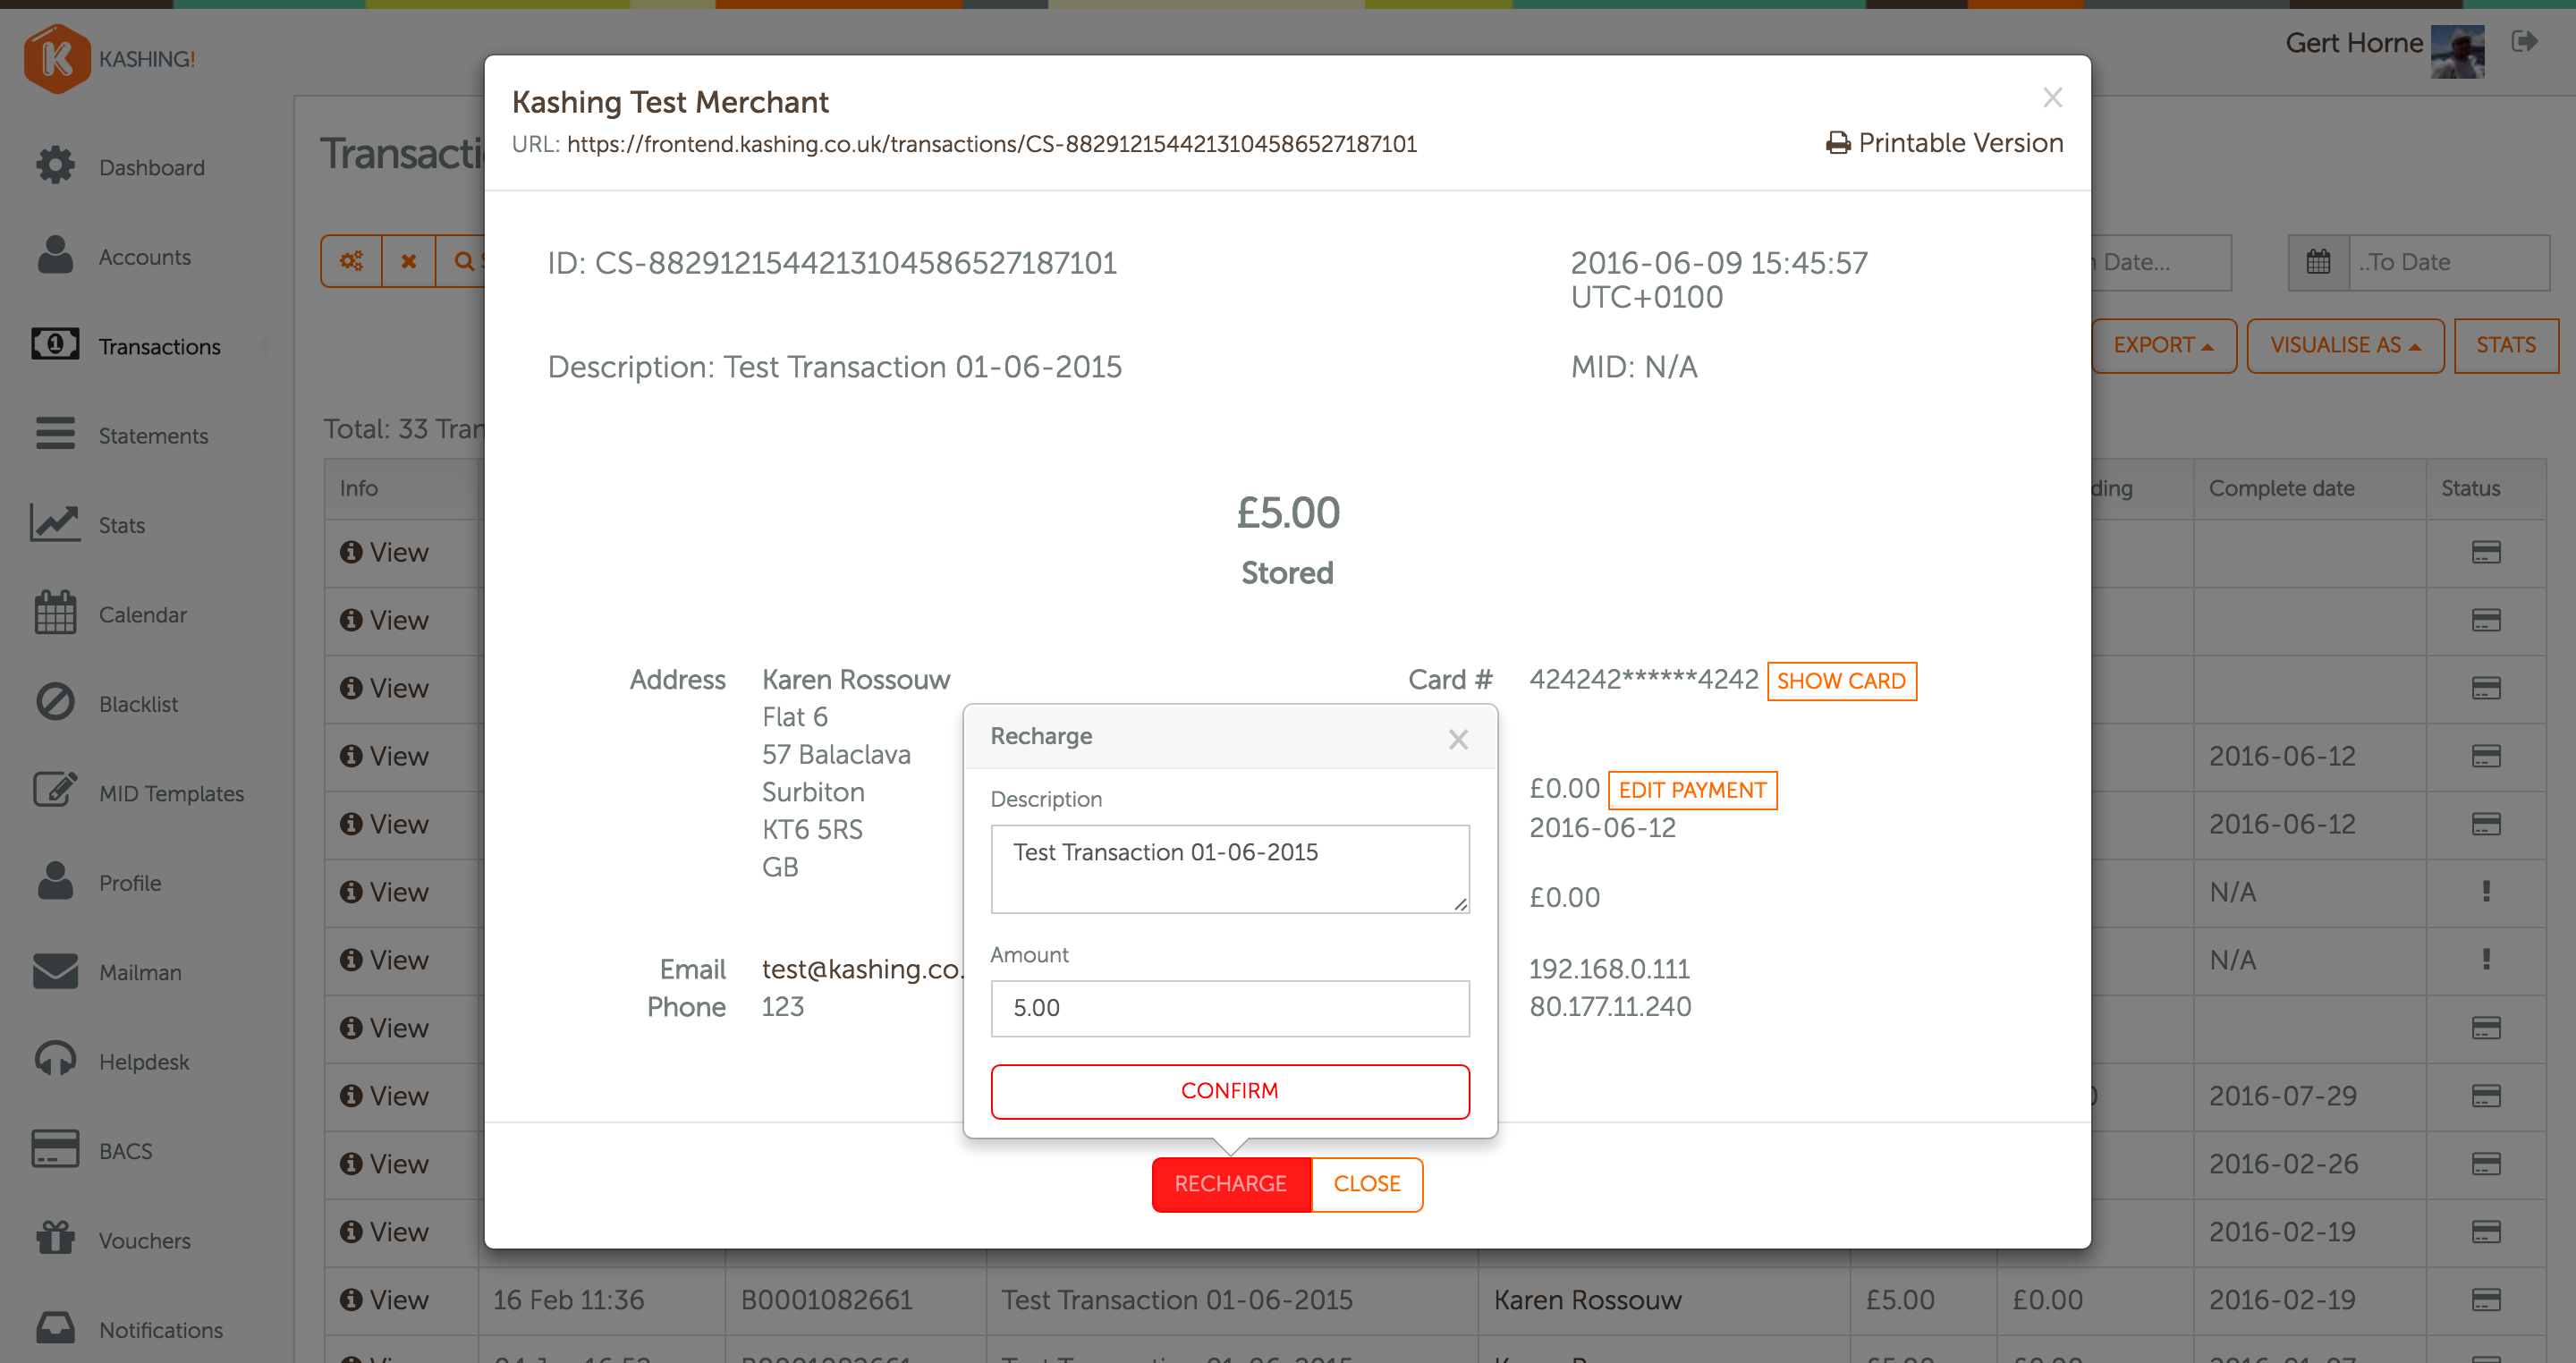
- The transaction will immediately appear at the top of the list. A status of Settling (clock icon) indicates that the payment has been successful.
Reconciliation
The Kashing system includes a Statements section that provides detailed information including a full breakdown of each wire transfer to you from Kashing.
Wire transafers:
- Click on Statements in the menu down the left hand side of the screen
- Locate a line that refers to a Wire Transfer. The reference number should appear on your bank statement.
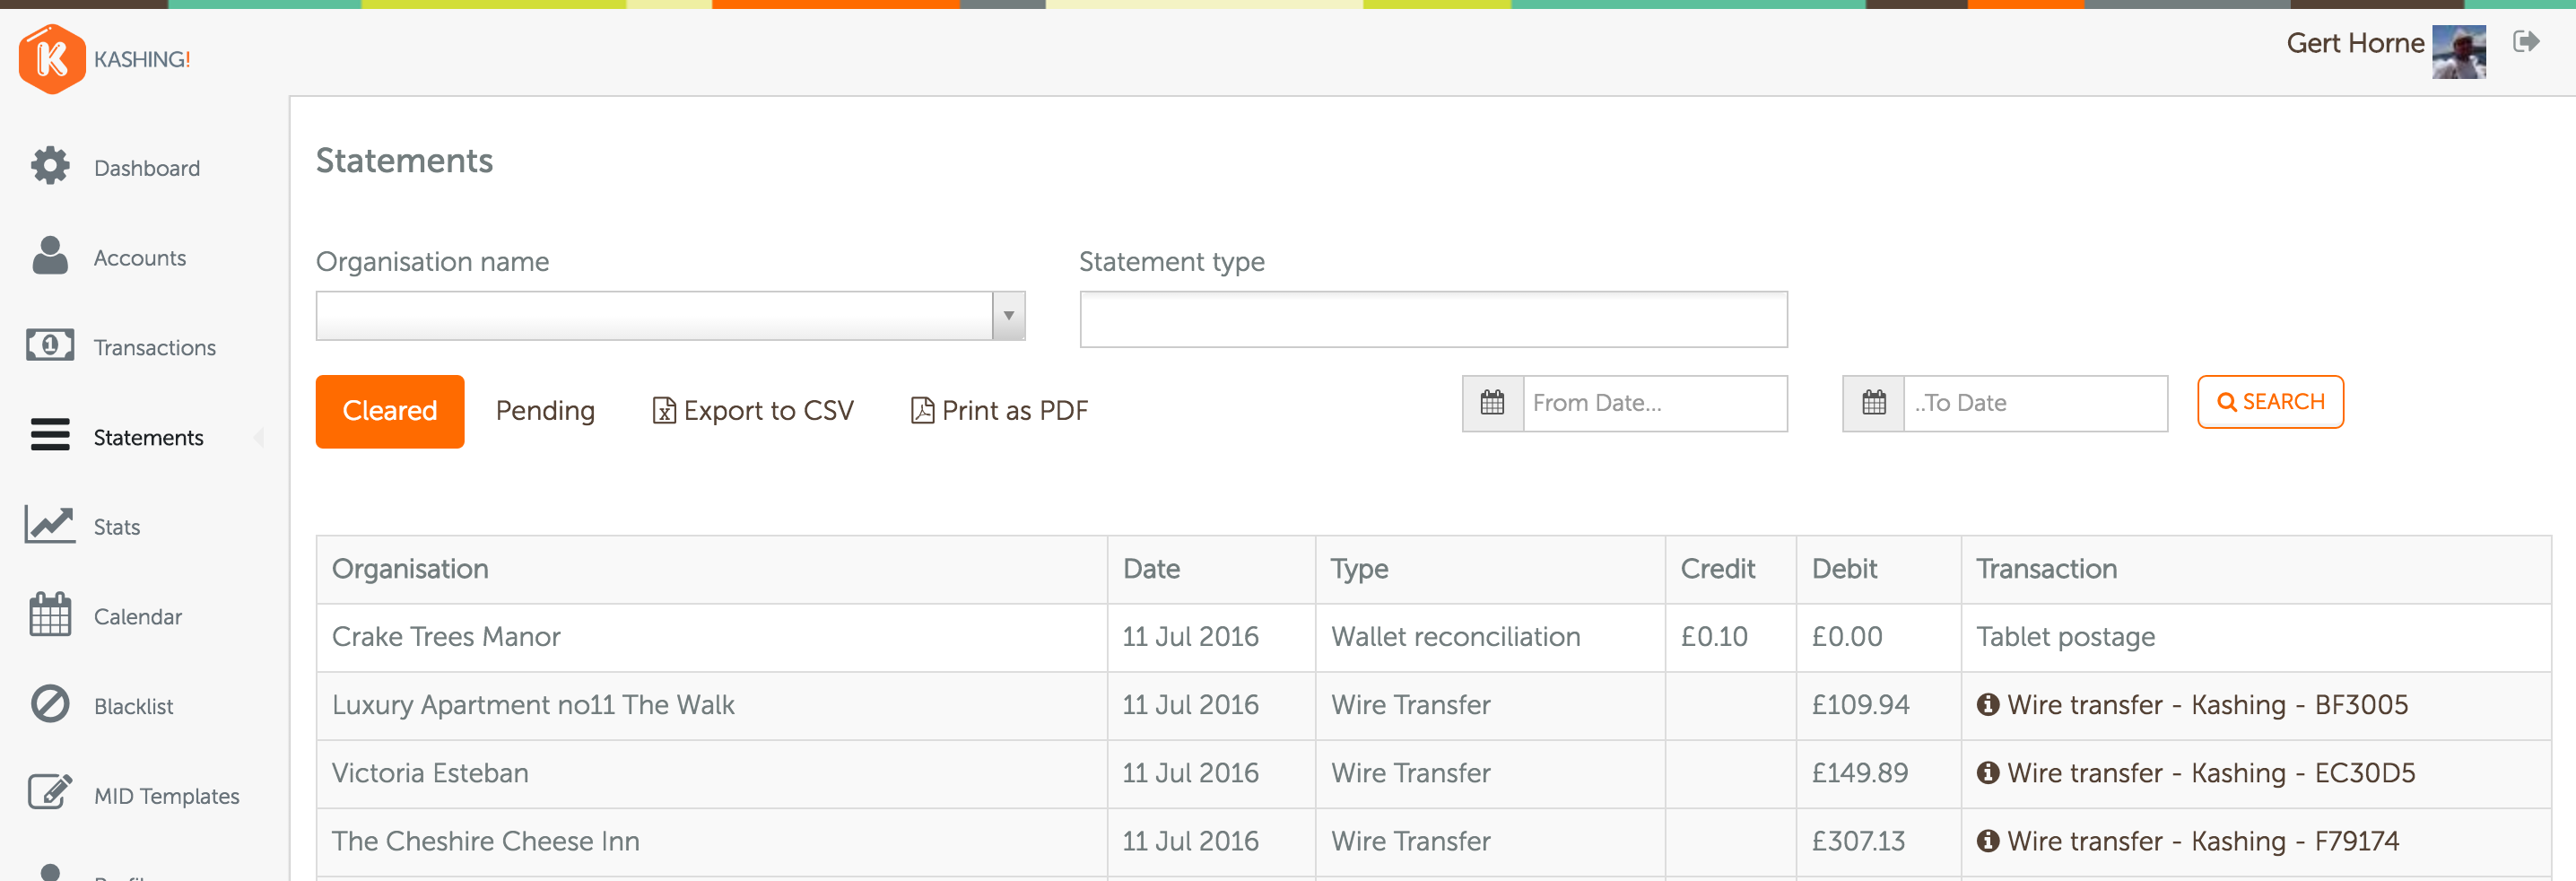
- Click on the Transactions column to view details of the Wire Transfer.
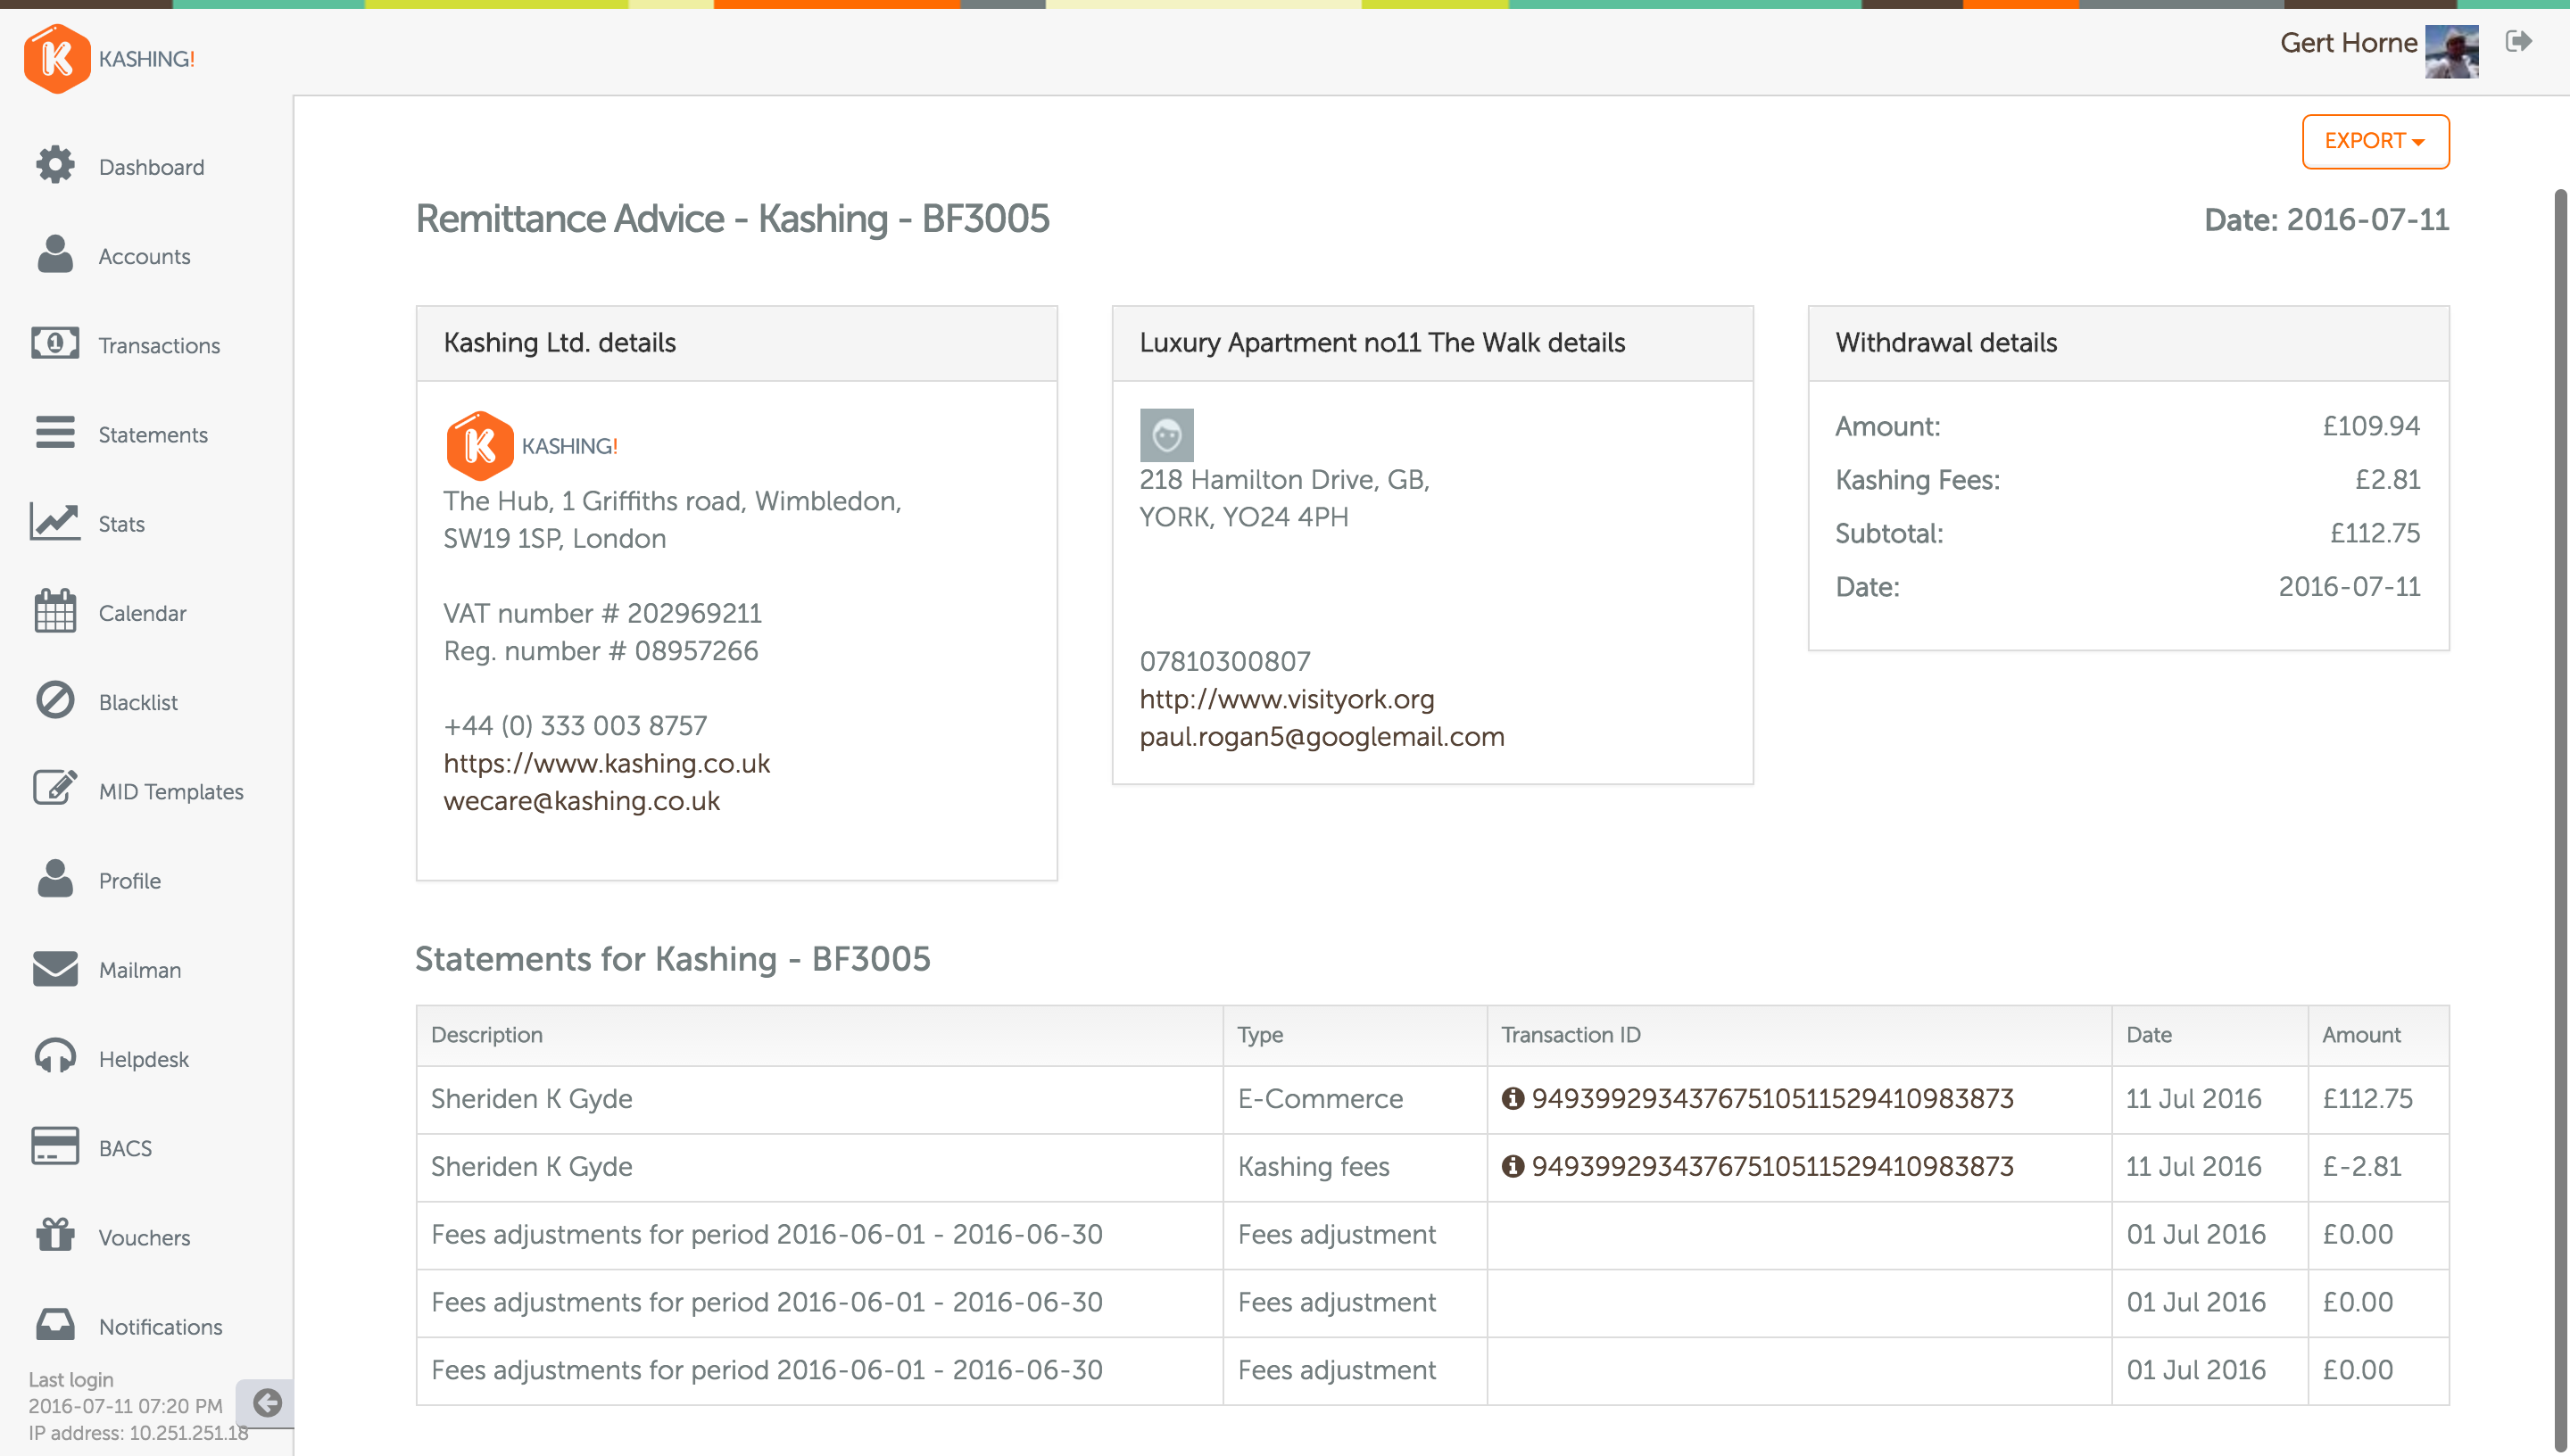
This includes a line for each payment included in the transfer plus additional lines for Kashing Fees and Rewards as applicable (note that Fees and Rewards including vouchers are paid at the end of each month).
- Customer Full Name: Click on this column to view full transaction details
- Transaction ID: The unique reference for this transaction
- Date: The date on which the transaction was processed
- Credit: The amount credited if applicable
- Debit: The amount debited if applicable
- Amount after fees: Net amount payable
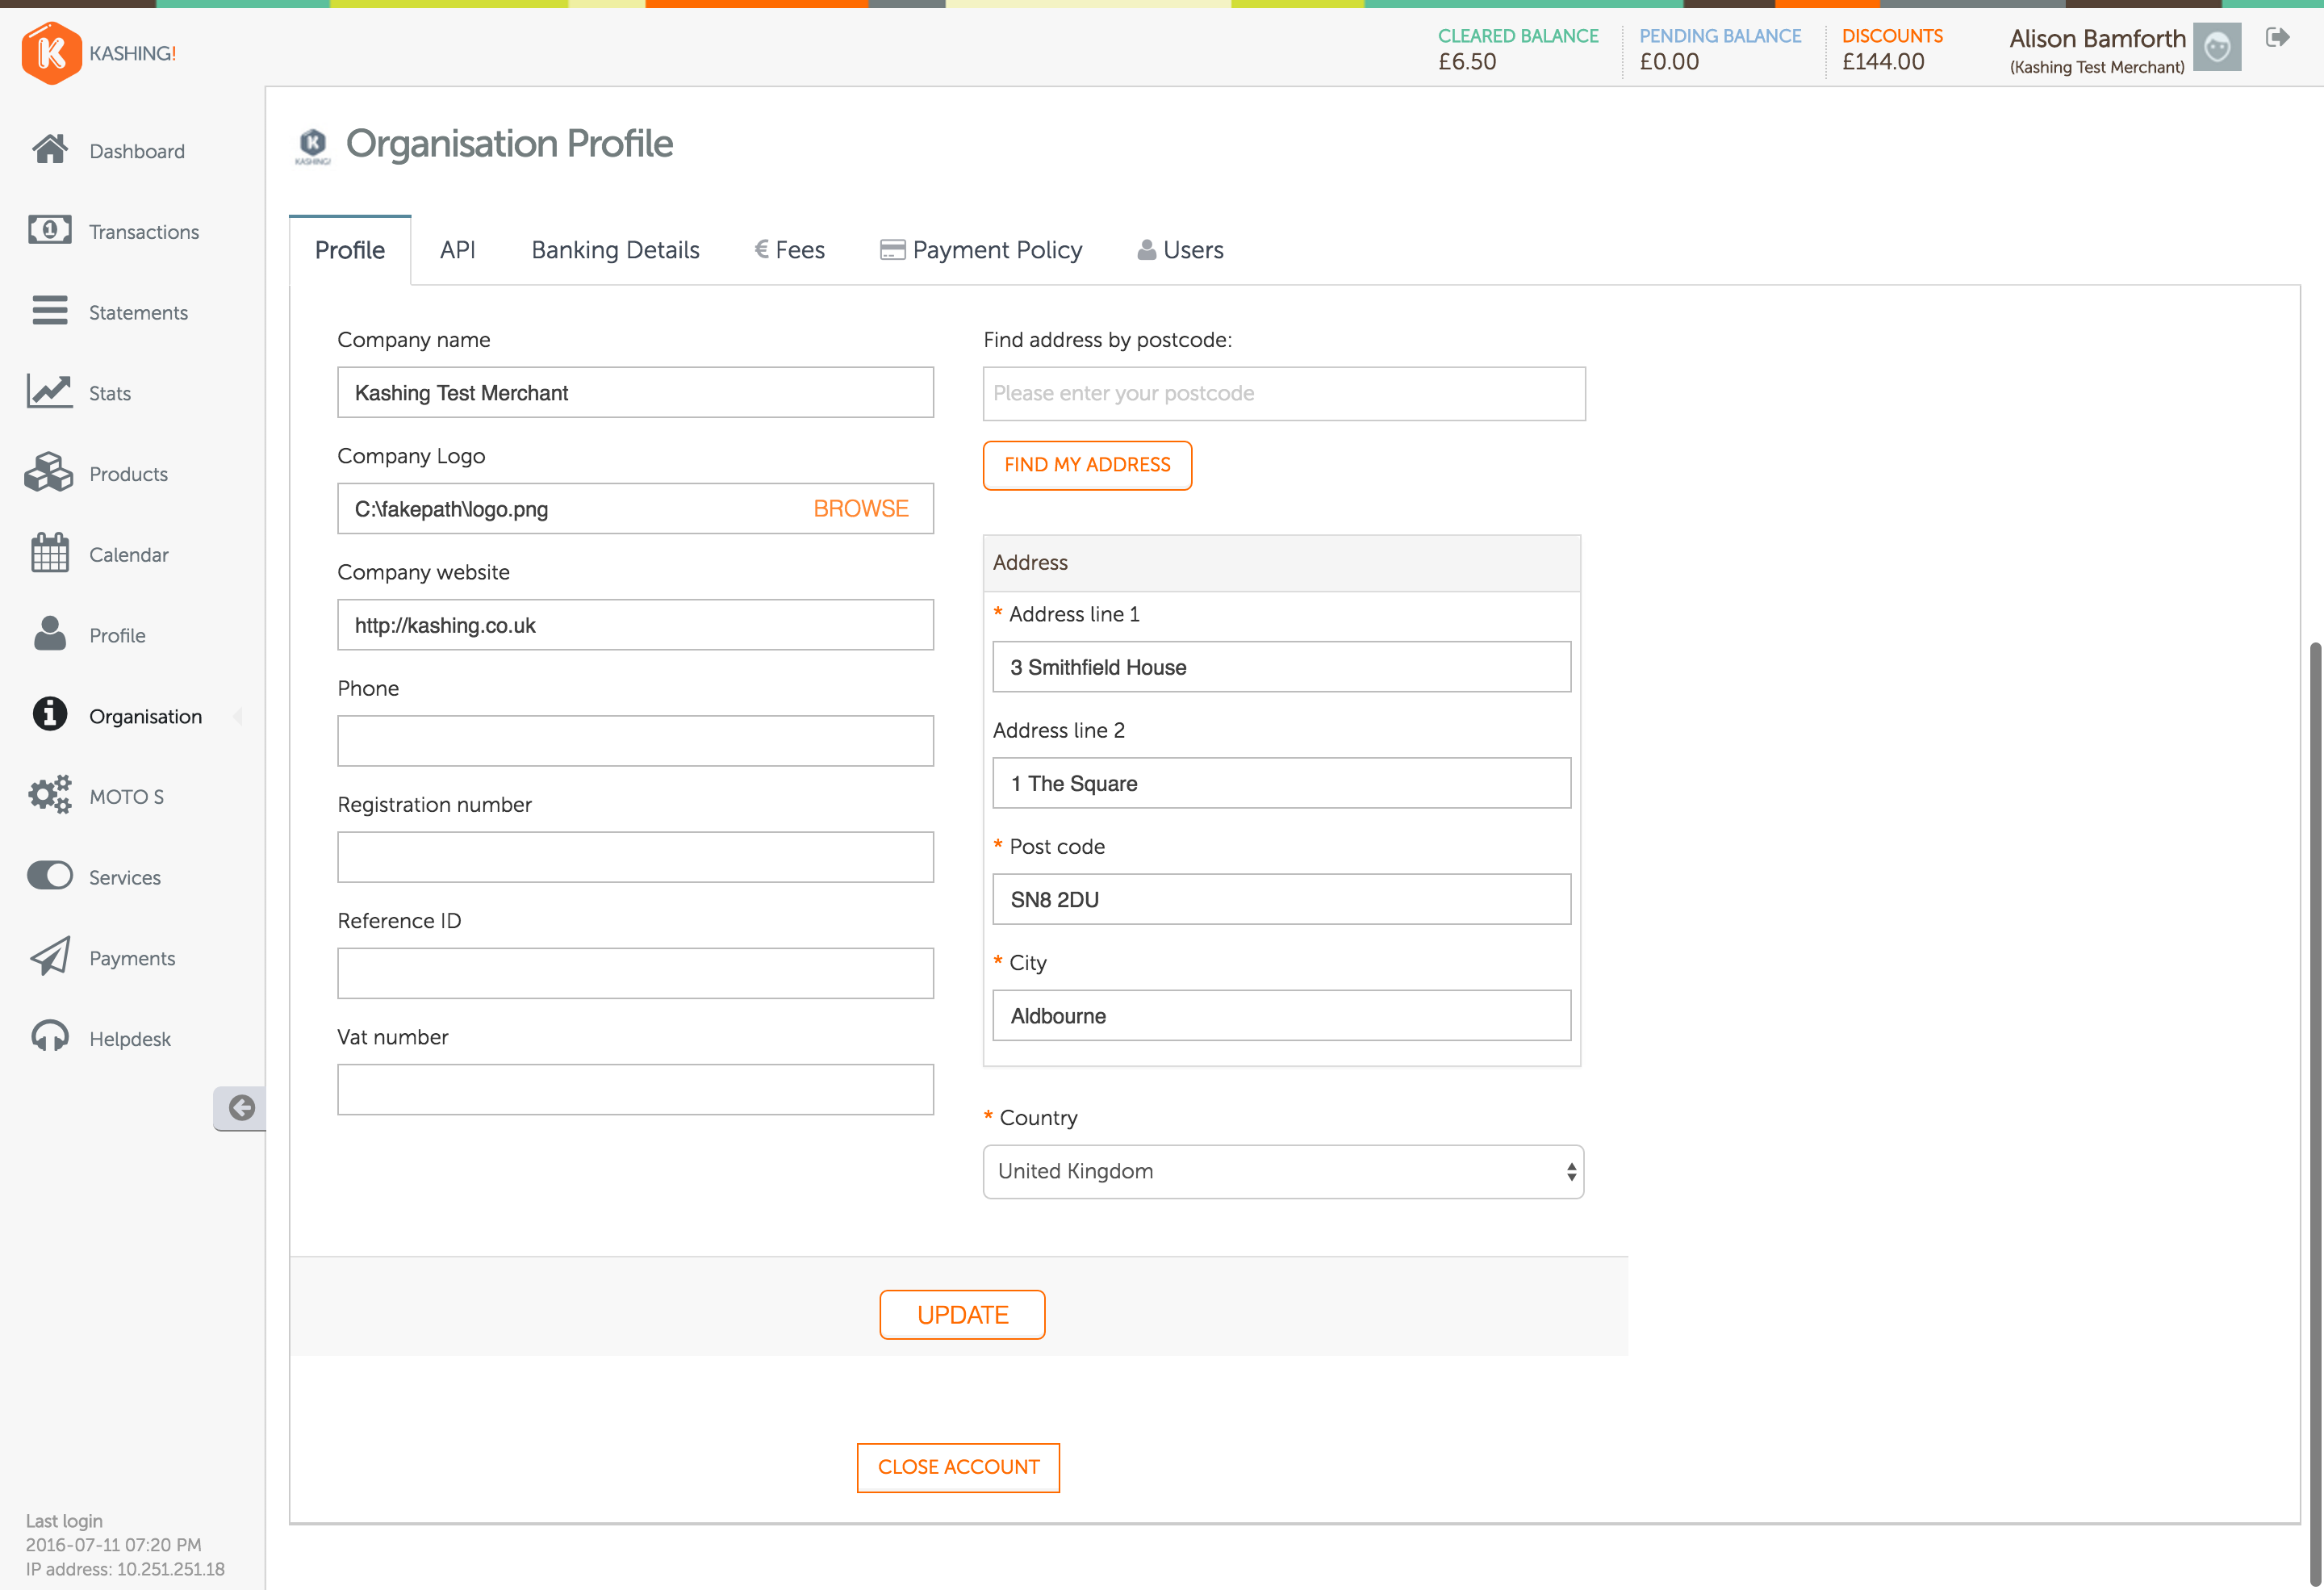
Company logo
The Kashing system gives you the option to upload a company logo; this is included in printouts/receipts generated by the system.
- Click on Organisation from the left hand menu.
- Click Browse in the Company Logo box.
- Locate the image on your computer that you would like to use for your profile picture (.jpg or.png) and click Open; the name of the chosen file appears in the Company Logo box.
- Click the Update button; your chosen picture appears alongside the words Organisation Profile.
Avatars
The Kashing system gives you the option to upload a profile picture; this is shown in the top right hand corner of the screen when you log in.
- Click on your name/organisation name near the top right hand corner of the screen to go to the User Profile screen.
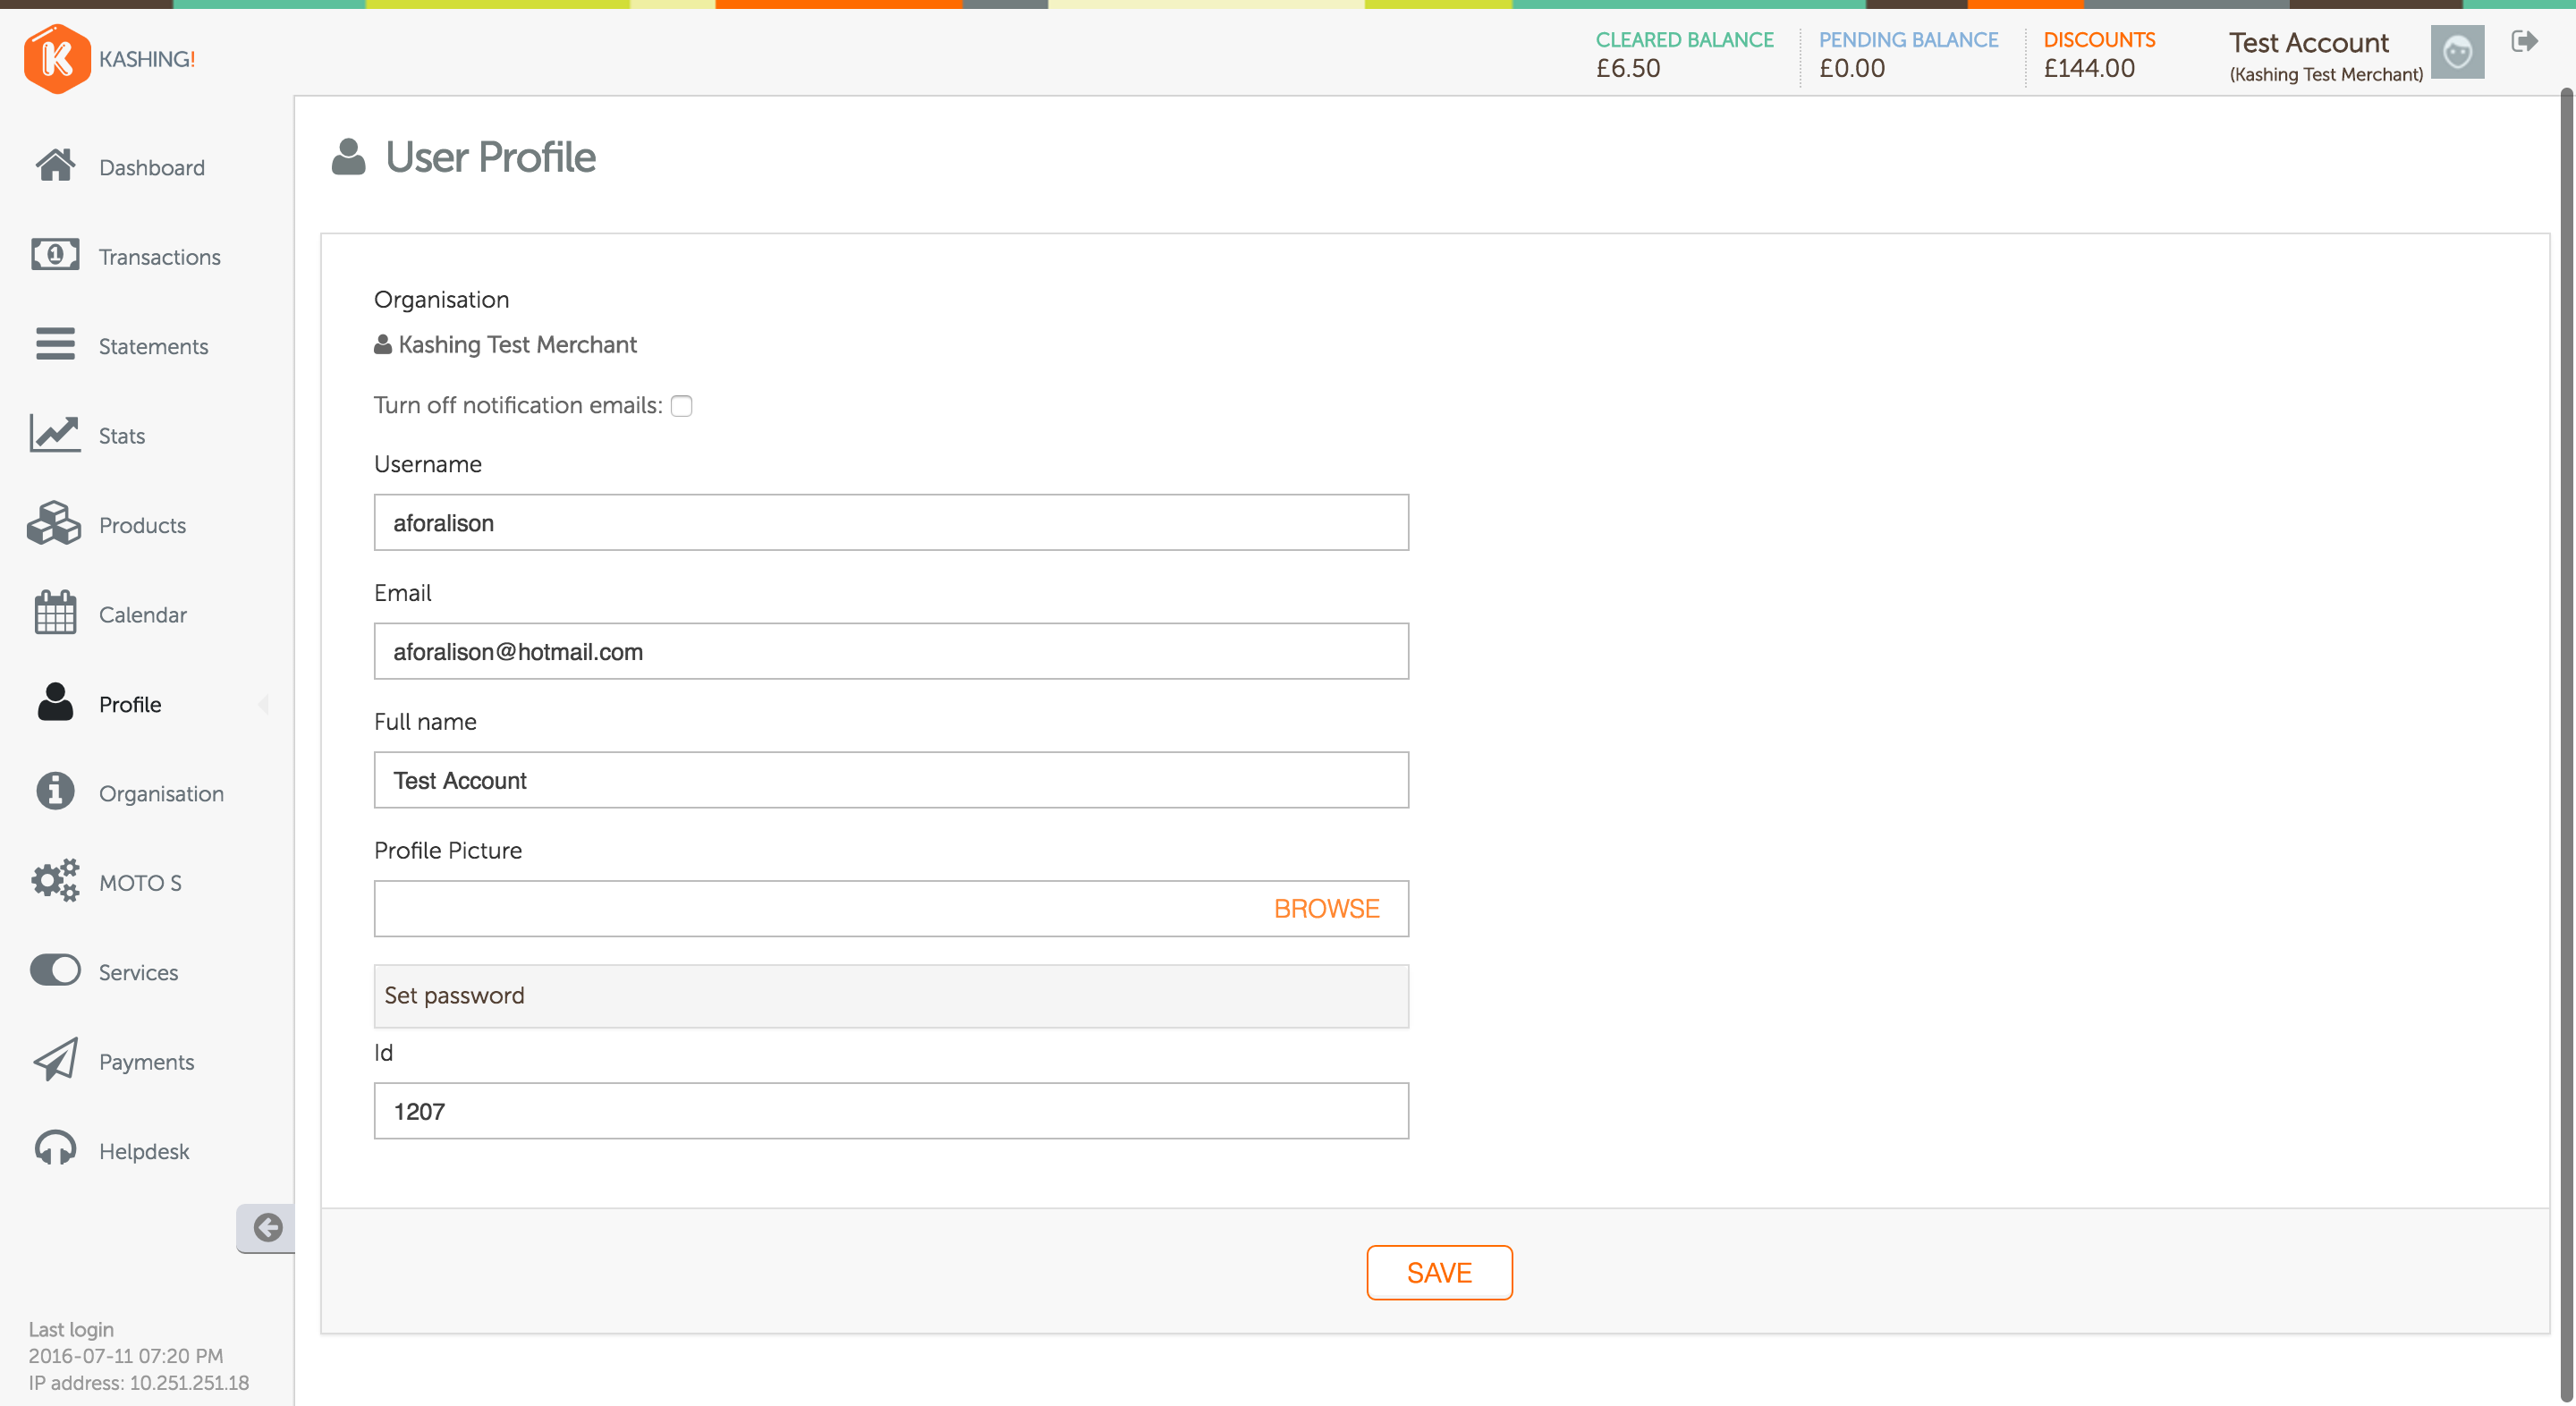
- Click Browse in the Profile Picture box.
- Locate the image on your computer that you would like to use for your profile picture (.jpg or.png) and click Open; the name of the chosen file appears in the Profile Picture box.
- Click the Save button; your chosen picture appears alongside your name in the top corner of the screen
Account
Close my account
Should you wish to no longer use our service and you want to protect your data from un-authorised access you can and should close your account. By closing your account we will remove all authorisation and access to your detail. Please export or download all the information you might need before closing your account as this will no longer be avaiable to you once you have successfully closed your account.
- Select Organisation from the menu bar
- Click the Close Account button
- Click OK to the warning message that appears.